AWS Identity Center (SSO)
This guide provides an overview of setting up AWS Identity Center (SSO) with ClickOps, detailing prerequisites and supported external identity providers. It explains how to integrate AWS SSO with providers like Okta, Azure AD, JumpCloud, and Google Workspace, including specific steps for configuring each.
How it Works
AWS Single Sign-On (AWS SSO) is a service that simplifies access management for AWS accounts and applications for managing your organization's workforce identity at scale across a multi-account AWS deployment. It enables users to sign in to AWS once and access multiple AWS accounts and applications without the need to re-enter credentials. To use it with an identity provider (e.g. such as Okta) for AWS SSO, administrators typically need to configure the integration within the AWS Management Console. This involves setting up a new AWS SSO instance, connecting it the IdP, and specifying the users or groups that should have access to AWS resources. AWS SSO provides logging and auditing capabilities, allowing organizations to track user access to AWS resources and monitor security-related events
-
SAML-Based Authentication
The integration between the IdP and AWS SSO relies on the Security Assertion Markup Language (SAML) for authentication and authorization. SAML enables the exchange of authentication and authorization data between Okta and AWS, allowing users to log in once to Okta and gain access to AWS resources without additional logins.
-
User Provisioning
AWS SSO can be configured to automatically provision and de-provision user accounts based on changes in the IdP directory. This helps keep user access in sync with changes made in the Okta environment.
-
AWS SSO Permission Sets
AWS SSO allows administrators to define fine-grained access policies, specifying which AWS accounts and services users from the IdP can access
-
Multi-Factor Authentication (MFA)
Organizations using Okta for authentication with AWS SSO can enhance security by enforcing multi-factor authentication (MFA) for added identity verification.
Once configured, users can experience single sign-on when accessing AWS resources. They log in to their IdP account and seamlessly gain access to AWS without needing to provide credentials again.
It's important to note that the specifics of the integration process may be subject to updates or changes, so it's recommended to refer to the official AWS documentation and Okta documentation for the most accurate and up-to-date information based on your current date.
Prerequisites
First, enable the AWS IAM Identity Center (successor to AWS Single Sign-On) service in the aws-admin account. This is the account where the aws-sso component will be deployed.
- Identity Center Prerequisites
- 2. Enable AWS Organizations
- 3. Enable IAM Identity Center
Precondition-0: Minimum-Clickops Bootstrap
-
Root Console Access (READONLY)
- Sign in to the management account using root credentials (console only — DO NOT create root access keys)
- This is your starting point; permissions to enable Identity Center are root-only
-
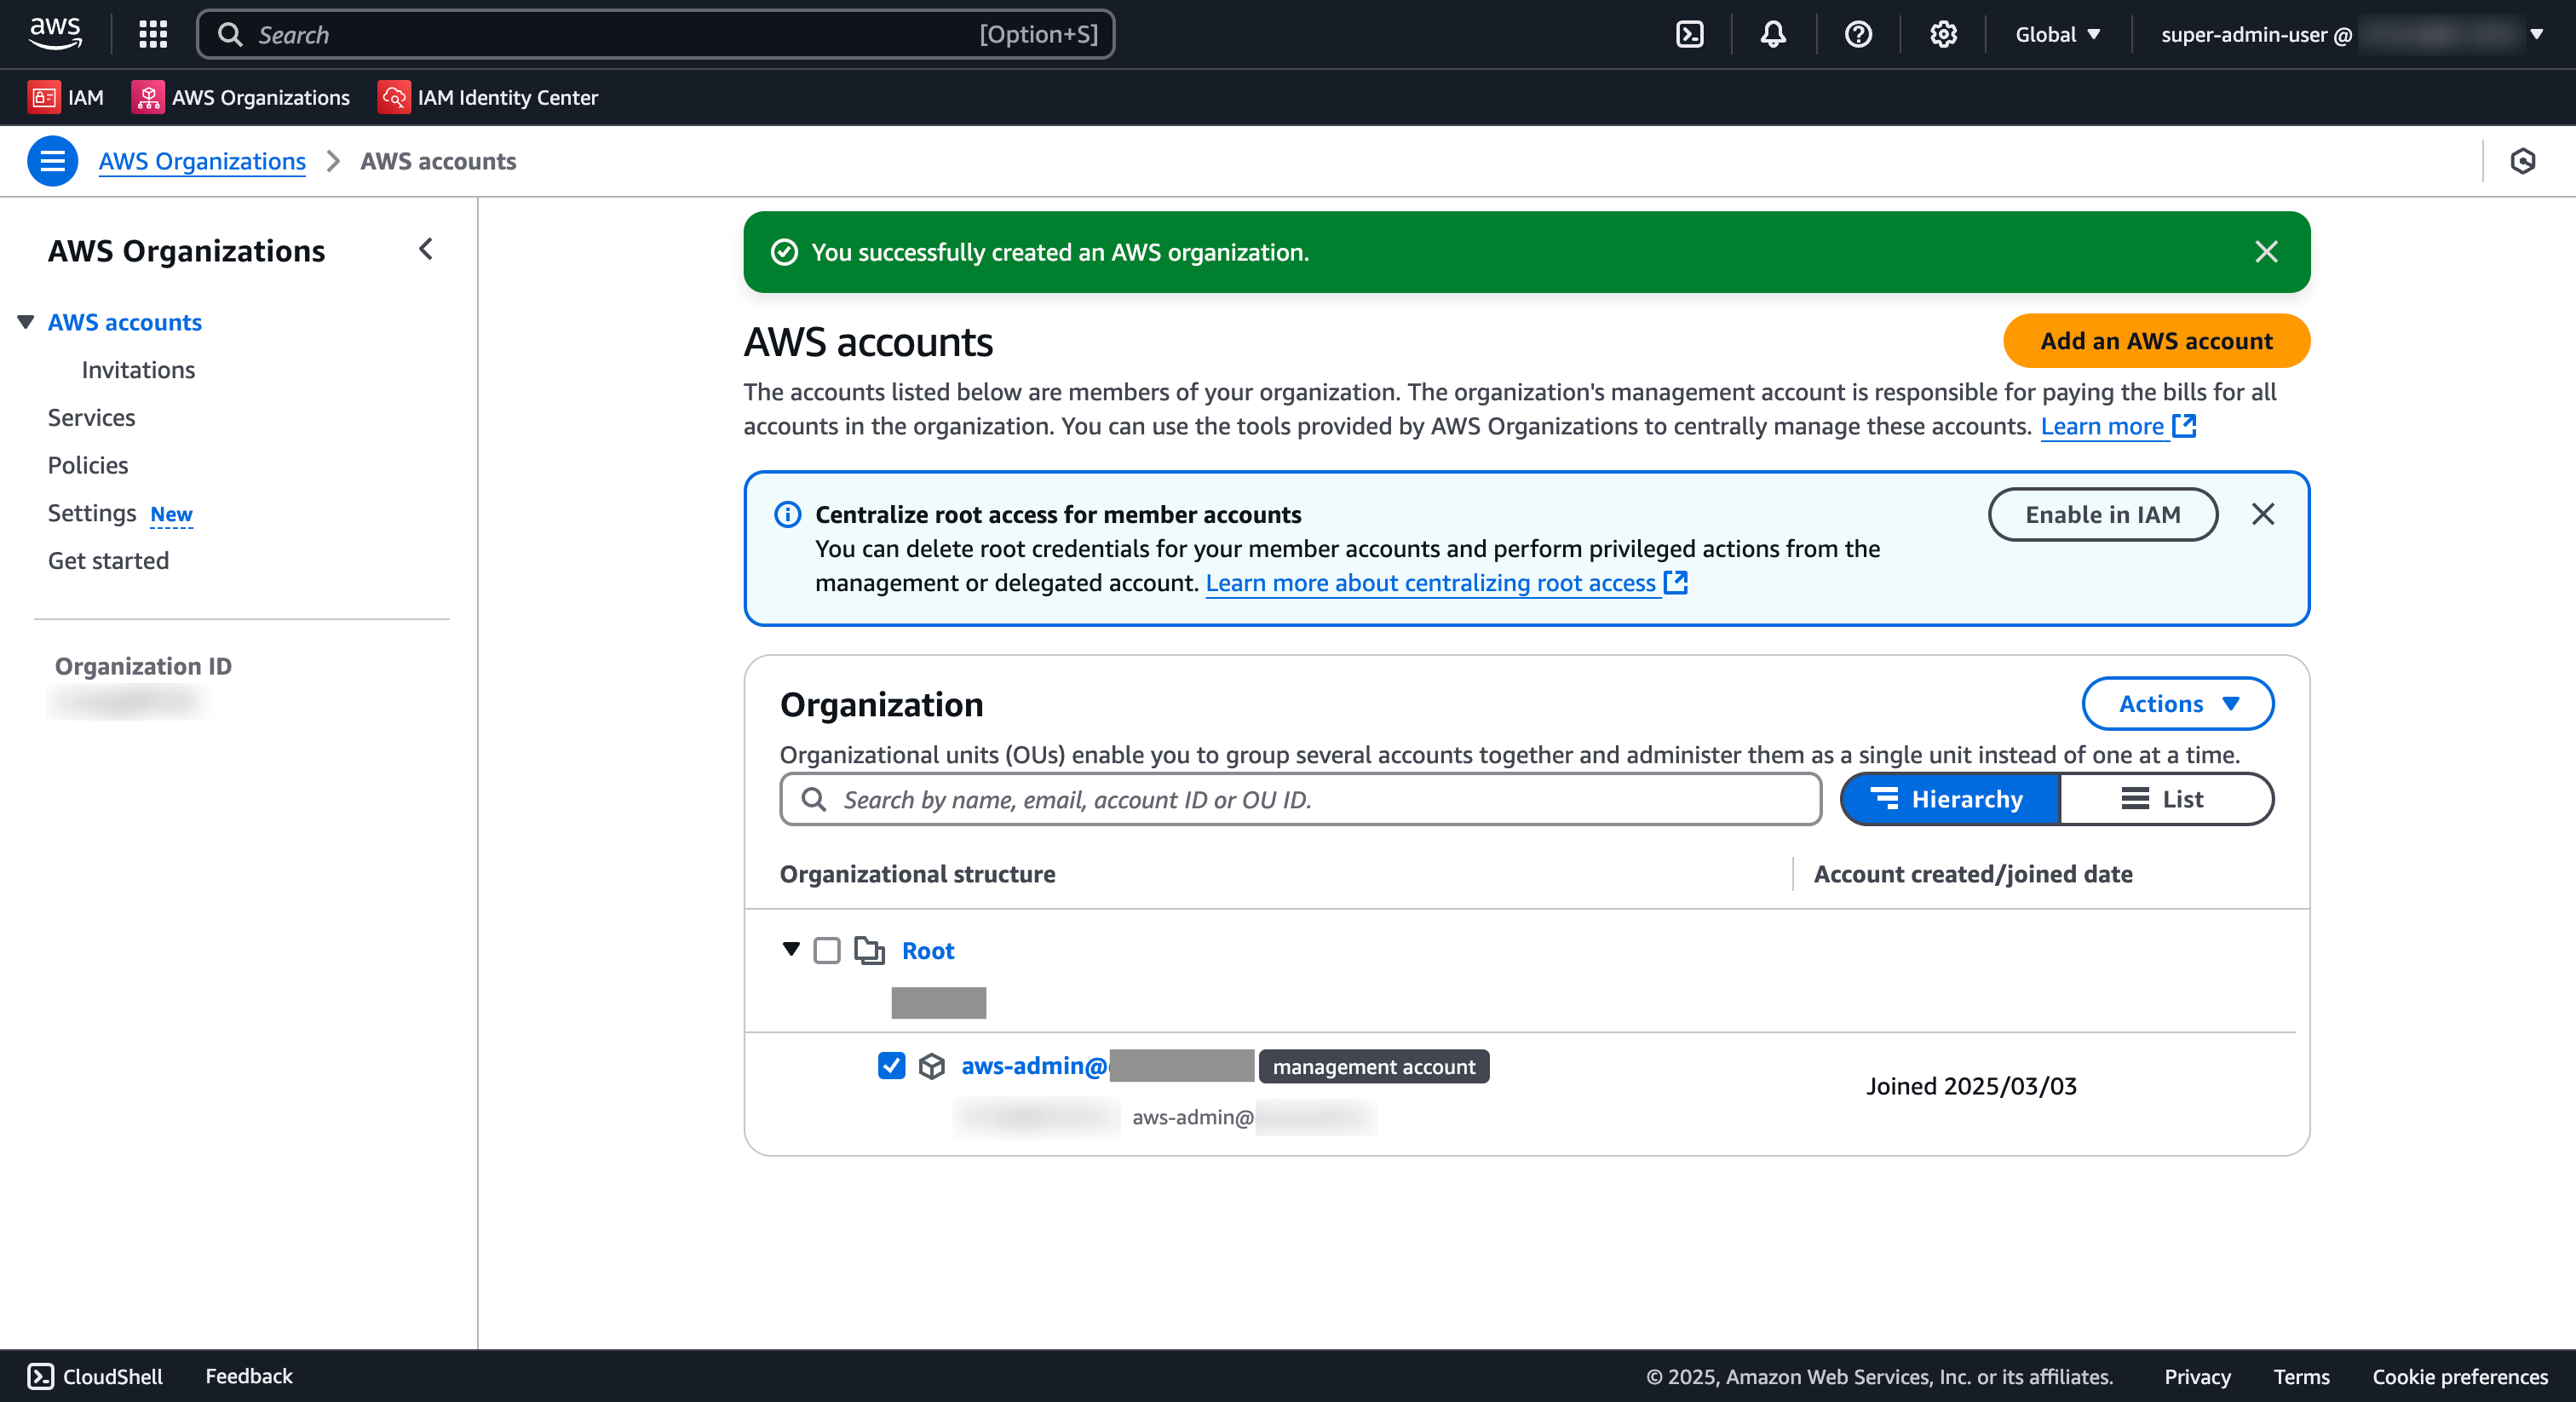
Enable AWS Organizations (one-time setup)
- Navigate to AWS Organizations in the AWS Web Console
- Click Enable
- This creates the organizational structure needed for IAM Identity Center
-
Enable IAM Identity Center (one-time setup)
- Navigate to IAM Identity Center (successor to AWS Single Sign-On)
- Select your deployment region — e.g.
ap-southeast-2for Sydney (OceanSoft), or your enterprise's primary region - Click Enable to activate the service
- Once enabled, IAM Identity Center creates service-linked roles in all AWS accounts within the organization
-
Create Admin Permission Set (one-time setup)
- In the Identity Center console, go to Permission sets
- Click Create permission set
- Select Predefined permission set and choose
AdministratorAccess - Click Next, then Create
-
Assign Your Identity Center User
- In Identity Center → Users and groups, confirm your Identity Center user exists (created during initial setup)
- Go to AWS accounts → management account → Assign users or groups
- Assign your user/group to the Admin permission set
- Wait for provisioning to complete
-
Configure Short-Lived SSO Credentials
- On your local machine, run:
aws configure sso - When prompted:
- SSO session name:
sso(or your preferred name) - SSO start URL:
https://<your-identity-center-id>.awsapps.com/start(found in Identity Center → Settings) - SSO region:
ap-southeast-2(for OceanSoft) or your enterprise's home region (e.g.us-east-1) - SSO registration scopes: leave default (OIDC consent scopes)
- SSO session name:
- Run:
aws sso login --profile sso - You will be redirected to a browser window to authenticate with your Identity Center credentials
- After successful auth, your profile will have temporary credentials (~12-hour session)
- On your local machine, run:
Why this approach:
- Root credentials are short-lived (console sessions expire) and audit-logged
- No long-lived IAM user or access keys are created, eliminating static credential risk
- Permission sets enforce least-privilege access per user/group/account
- Short-lived Identity Center credentials (12h default, configurable) are automatically rotated by AWS
- SCIM provisioning (next step) automatically syncs users and groups from your external IdP into AWS, so you never manually create IAM users again

Once enabled, IAM Identity Center creates a service-linked role in all accounts within the organization in AWS Organizations. IAM Identity Center also creates the same service-linked role in every account that is subsequently added to your organization. This role allows IAM Identity Center to access each account's resources on your behalf.
Terraform Automation (Recommended)
Instead of ClickOps, use the iam-identity-center Terraform module to manage IAM Identity Center resources as code. The module covers groups, users, permission sets, account assignments, and ABAC attributes.
Key Facts
- IAM Identity Center can be enabled in any region — not only us-east-1. Our reference setup uses
ap-southeast-2. - Since November 2023, IAM Identity Center works on standalone accounts without AWS Organizations. Permission sets, groups, and account assignments all function on a single account.
- If you need account-name-to-ID resolution (referencing accounts by name instead of 12-digit ID), you need org-level SSO (
enable_organizations_lookup = true). For standalone accounts, setenable_organizations_lookup = false.
Module Source
Choose one source depending on your context:
# Production — Pinned SHA (recommended)
source = "git::https://github.com/nnthanh101/terraform-aws.git//modules/sso?ref=978f8fc70e0c54975fd0ff6c19ae7dd972cad0ce"

# Development — Local path (monorepo development ONLY)
# source = "../../../terraform-aws/modules/sso"  # DEV ONLY

# Option 3 — Terraform Registry (after registry publish)
source  = "oceansoft/sso/aws"
version = "~> 2.0"
Standalone Account Setup
For a standalone account (no AWS Organizations). Example: OceanSoft management account in Sydney region.
terraform {
  required_version = ">= 1.11.0"
  required_providers {
    aws = {
      source  = "hashicorp/aws"
      version = ">= 6.28, < 7.0"
    }
  }

  # S3 native locking, no DynamoDB (Terraform 1.10+)
  backend "s3" {
    region           = "ap-southeast-2"      # or $AWS_DEFAULT_REGION
    bucket           = "<ACCOUNT_ID>-tfstate-<REGION>"
    key              = "identity/terraform.tfstate"
    use_lockfile     = true
    encrypt          = true
    skip_credentials_validation = false
  }
}

provider "aws" {
  alias  = "identity_center"
  region = "ap-southeast-2"  # Set to $AWS_DEFAULT_REGION (e.g., ap-southeast-2 for Sydney, us-east-1 for N. Virginia)

module "identity_center" {
  source = "../../modules/iam-identity-center"

  providers = {
    aws = aws.identity_center
  }

  # Standalone: no Organizations lookup needed
  enable_organizations_lookup = false

  sso_groups = {
    PlatformTeam = {
      group_name        = "PlatformTeam"
      group_description = "Platform engineering team"
    }
    AuditTeam = {
      group_name        = "AuditTeam"
      group_description = "Audit and compliance team with read-only access"
    }
  }

  permission_sets = {
    Admin = {
      description          = "Full administrator access"
      session_duration     = "PT4H"
      aws_managed_policies = ["arn:aws:iam::aws:policy/AdministratorAccess"]
      tags                 = { ManagedBy = "Terraform" }
    }
    ReadOnly = {
      description          = "Read-only access across all services"
      session_duration     = "PT8H"
      aws_managed_policies = ["arn:aws:iam::aws:policy/ReadOnlyAccess"]
      tags                 = { ManagedBy = "Terraform" }
    }
  }

  account_assignments = {
    PlatformAdmins = {
      principal_name  = "PlatformTeam"
      principal_type  = "GROUP"
      principal_idp   = "INTERNAL"
      permission_sets = ["Admin"]
      account_ids     = ["<MANAGEMENT_ACCOUNT_ID>"]  # e.g., 111111111111
    }
    AuditReadOnly = {
      principal_name  = "AuditTeam"
      principal_type  = "GROUP"
      principal_idp   = "INTERNAL"
      permission_sets = ["ReadOnly"]
      account_ids     = ["<MANAGEMENT_ACCOUNT_ID>"]  # e.g., 111111111111
    }
  }
}
Multi-Account Landing Zone
For org-level SSO with multiple accounts (enable_organizations_lookup = true). Requires AWS Organizations to be created first, then IAM Identity Center enabled via Console ("Enable with AWS Organizations"):
module "aws-iam-identity-center" {
  source = "../../modules/iam-identity-center"

  # Org-level: resolves account names to IDs
  enable_organizations_lookup = true

  sso_groups = {
    LZAdministrators = {
      group_name        = "LZAdministrators"
      group_description = "Landing Zone administrators — full access"
    }
    LZPowerUsers = {
      group_name        = "LZPowerUsers"
      group_description = "Power users — deploy workloads, no IAM/billing"
    }
    LZReadOnly = {
      group_name        = "LZReadOnly"
      group_description = "Read-only access for compliance and audit"
    }
    LZSecurityAudit = {
      group_name        = "LZSecurityAudit"
      group_description = "Security audit — CloudTrail, GuardDuty, Config"
    }
  }

  permission_sets = {
    LZAdministratorAccess = {
      description          = "Full admin access (break-glass only)"
      session_duration     = "PT1H"
      aws_managed_policies = ["arn:aws:iam::aws:policy/AdministratorAccess"]
      tags                 = { ManagedBy = "Terraform", Tier = "admin" }
    }
    LZPowerUserAccess = {
      description          = "Power user — deploy workloads, no IAM mutation"
      session_duration     = "PT4H"
      aws_managed_policies = ["arn:aws:iam::aws:policy/PowerUserAccess"]
      tags                 = { ManagedBy = "Terraform", Tier = "power-user" }
    }
    LZReadOnlyAccess = {
      description          = "Read-only access for all accounts"
      session_duration     = "PT8H"
      aws_managed_policies = ["arn:aws:iam::aws:policy/ReadOnlyAccess"]
      tags                 = { ManagedBy = "Terraform", Tier = "read-only" }
    }
  }

  account_assignments = {
    LZAdmins_Management = {
      principal_name  = "LZAdministrators"
      principal_type  = "GROUP"
      principal_idp   = "INTERNAL"
      permission_sets = ["LZAdministratorAccess"]
      account_ids     = ["111111111111"]  # management account
    }
    LZReadOnly_AllAccounts = {
      principal_name  = "LZReadOnly"
      principal_type  = "GROUP"
      principal_idp   = "INTERNAL"
      permission_sets = ["LZReadOnlyAccess"]
      account_ids     = ["111111111111", "222222222222", "333333333333"]
    }
  }

  # ABAC: Environment-scoped access control
  sso_instance_access_control_attributes = [
    {
      attribute_name = "Environment"
      source         = ["$${path:enterprise.Environment}"]
    },
    {
      attribute_name = "CostCenter"
      source         = ["$${path:enterprise.CostCenter}"]
    },
  ]
}
Deploy Commands
# Step 1: Tier 1 snapshot tests — no AWS credentials required (2-3s)
task test:tier1 MODULE=iam-identity-center

# Step 2: Validate format and syntax
task build:validate

# Step 3: Deploy
terraform -chdir=projects/iam-identity-center init
terraform -chdir=projects/iam-identity-center plan
terraform -chdir=projects/iam-identity-center apply

# Step 4: Cross-validate deployed resources
# Instance: ssoins-82591e7bc2548c18 | Identity store: d-97679527f0
aws sso-admin list-permission-sets \
  --instance-arn arn:aws:sso:::instance/ssoins-82591e7bc2548c18 \
  --region ap-southeast-2

aws identitystore list-groups \
  --identity-store-id d-97679527f0 \
  --region ap-southeast-2

# Step 5: Tear down (sandbox only)
terraform -chdir=projects/iam-identity-center destroy
Standalone account: Enable IAM Identity Center via Console first, then run Terraform.
Org-level SSO: Create AWS Organization first, then enable IAM Identity Center via Console ("Enable with AWS Organizations"), then run Terraform. Reversing this order requires re-enabling Identity Center from scratch.
Configure your Identity Provider
Terraform vs. ClickOps Boundary (Critical)
ClickOps only (irreducible manual steps):
- Switch IAM Identity Center identity source from internal to external IdP (one-time AWS console operation)
- Complete the SAML handshake: download metadata from IdP, upload to AWS Identity Center
- Enable SCIM provisioning: retrieve SCIM endpoint + access token from AWS, paste into IdP
Terraform fully automates (after ClickOps steps above):
- Groups (create in internal directory, or sync from external IdP via SCIM)
- Permission sets (define fine-grained access policies)
- Account assignments (bind groups + permission sets to AWS accounts)
This distinction prevents manual drift. Once SCIM is enabled, IdP users/groups automatically sync into AWS; Terraform then assigns permissions to those synced groups.
Supported IdPs & Setup Instructions
Instructions below cover the most common identity providers. For others (CyberArk, OneLogin, Ping Identity), refer to AWS documentation for additional IdP integrations.
Internal Identity Center Directory (no external IdP): Use this if your organization does not have a centralized identity provider. Create users/groups directly in AWS Identity Center, and Terraform manages permission sets and account assignments.
- Microsoft Entra AD (Azure AD)
- 🛡️ Okta with SSO
- Microsoft 365
- GSuite and Other External IdPs
- JumpCloud
Microsoft Entra ID (formerly Azure AD) is a cloud-based directory service that integrates with AWS Identity Center via SAML authentication and SCIM provisioning. Users and groups in Entra sync automatically into AWS Identity Center, where Terraform manages permission sets and account assignments.
Setup Entra AD with AWS Identity Center
Phase 1: Enable SAML + SCIM Handshake (ClickOps Only)
-
In AWS Identity Center Console (ap-southeast-2)
- Navigate to Settings → Identity source → Change identity source
- Select External identity provider
- Copy the IAM Identity Center Assertion Consumer Service (ACS) URL and issuer URL — you will need these in Entra
- In the IdP SAML metadata section: you will upload Entra metadata here after exporting it
-
In Microsoft Entra Admin Center (aad.portal.azure.com) — Use the Gallery App
- Go to Enterprise Applications → + New application → Search the gallery
- Search for
AWS IAM Identity Center(the pre-integrated gallery app) - Click Create to add the app
- The gallery app automatically populates SAML metadata and supports SCIM provisioning, which eliminates manual Identifier/ACS/metadata entry and reduces misconfiguration risk
- Navigate to Single sign-on → SAML
- The Service provider metadata section should already contain:
- Identifier (Entity ID): pre-populated with IAM Identity Center issuer URL
- Reply URL (Assertion Consumer Service URL): pre-populated with IAM Identity Center ACS URL
- Verify these values match the AWS URLs you copied in Step 1; if they differ, you may have selected a non-gallery app by mistake — delete it and search for
AWS IAM Identity Centerin the gallery again - Download the Federation Metadata XML from the SAML Signing Certificates section
- Save this as
entra-metadata.xml
If the gallery app is unavailable (rare): follow the non-gallery fallback steps to manually enter Entity ID, ACS URL, and download metadata XML. However, gallery is preferred because it supports SCIM auto-provisioning of users and groups.
-
Back in AWS Identity Center Console
- In Change identity source → Identity provider metadata: upload the
entra-metadata.xmlfile - Confirm the change (type
ACCEPTin the dialog)
- In Change identity source → Identity provider metadata: upload the
-
In Microsoft Entra Admin Center
- Navigate to Users and groups → + New group
- Create groups that match your permission-set names (e.g.,
PlatformTeam,PowerUsers,AuditTeam,SecurityTeam) - Assign users to these groups
-
Enable SCIM Provisioning in AWS Identity Center Console
- Go to Settings → Automatic provisioning → Enable
- Copy the SCIM endpoint and Access token from the dialog
- Save these securely (1Password)
-
In Microsoft Entra Admin Center
- Return to AWS Identity Center application → Provisioning
- Click Get started
- Set Provisioning Mode to Automatic
- Under Admin Credentials:
- Tenant URL: paste the SCIM endpoint from Step 5
- Secret Token: paste the access token from Step 5
- Click Test Connection → verify green success message
- Enable Provision users and Provision groups
- Save
-
Verify Sync
- In AWS Identity Center Console: go to Groups and verify that Entra groups now appear with Created by: SCIM source
- Wait 5-15 minutes for users to sync (initial sync may take longer)
Phase 2: Assign Permission Sets (Terraform)
Once groups sync into AWS Identity Center, Terraform (infra/terraform/aws/identity/) manages permission sets and account assignments:
-
In
infra/terraform/aws/identity/config/, define account assignments that reference the synced Entra groups:account_assignments:
PlatformAdmins:
principal_name: "PlatformTeam" # Must match the Entra group name
principal_type: "GROUP"
principal_idp: "EXTERNAL" # External = Entra-synced group
permission_sets:
- "LZAdministratorAccess"
account_ids:
- "111111111111" # management account -
Run
terraform planandterraform applyininfra/terraform/aws/identity/ -
Verify in AWS Identity Center Console: go to AWS accounts → select an account → Users and groups → confirm that Entra groups now have permission-set assignments
Testing Access
Verify Entra user can log in to AWS
- Assign an Entra user to one of your permission-set groups
- Wait for SCIM sync (usually instant)
- In AWS Identity Center: go to Settings and copy the AWS access portal URL (format:
https://d-xxxxxxxxxx.awsapps.com/start) - Open the URL in a private browser window
- You should see the Entra login page
- Log in with an Entra user account
- On successful auth, you should see the AWS access portal with available roles corresponding to the permission sets assigned to that user's groups
Learn more: AWS documentation: Use Microsoft Entra ID as an external IdP for IAM Identity Center
Okta is a common business suite that has an active director to manage users and permissions. We can utilize this to login to AWS by leveraging Applications that are used to sign in to things from your Okta Account.
Setup Okta with AWS Identity Center
⛑️ Your organization might be already managing workforce identity in Microsoft Active Directory or a standards-based identity provider such as Okta Universal Directory or Azure AD. In these situation, you can integrate these external identity providers (IDP) with AWS IAM Identity Center to provide a unified administration experience to define, customize, and assign fine-grained access. In this section, you will configure an Okta Universal Directory as the external Identity Provider (IDP) with AWS IAM Identity Center.
- 🛡️ Create an Okta account
- 🛡️ Create Users/Groups in Okta
- 🛡️ Create IAM Identity Center Application in Okta
- ⛅️ Configure/Change the Identity Source in Identity Center
- 🛡️ Configure Okta SSO
- 🛡️ Configure Provision/SCIM in Okta
- 🛡️ Assign User/Groups to IAM Identity Center Application in Okta
- ⛅️ Assign access to AWS Accounts through Permission Sets
- 🛡️⛅️ Test access
- 1. 🛡️ Create Account
- 2. 🛡️ Create Users/Groups in Okta
- 3. 🛡️ Create SSO Application
- 4. Change Identity Source
- 5. 🛡️ Configure Okta SSO
- 6. 🛡️ Configure Provision/SCIM
- 7. 🛡️ Assign User/Groups to AWS-SSO
- 8. ⛅️ Permission Sets
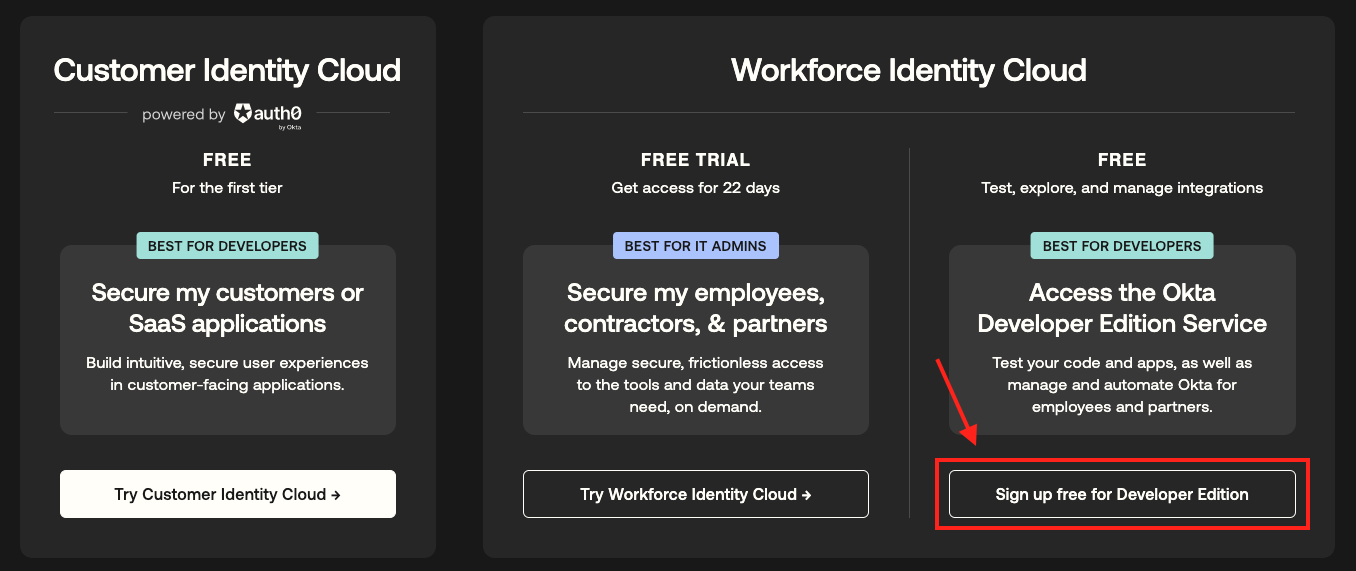
- Click here to create your free Okta account: No credit card is required.
- Select
Sign up free for Developer Edition.- You will receive an email. Click on the link to activate your account.
- Set the password (and optionally MFA) for your Okta Account.
-
1. Create Groups in Okta: Let's create a group
Okta-AWS-PowerUserAccessin Okta- Navigate to the
Directorysection on the left-hand side of the page. - Choose Groups
- Click on
Add groupbutton Okta Add Group page - In the Add Group dialog:
- Name - Provide the name of the group:
Okta-AWS-PowerUserAccess - Description (optional) - Provide the description for the group:
Enables PowerUserAccess to an AWS Account. - Click on the
Savebutton Okta Add Group page
- Name - Provide the name of the group:
- Navigate to the
-
2. Create People
- Navigate to the Directory section on the left-hand side of the page.
- Choose
People - Click on
Add personbutton Okta Add User page - In the Add Person dialog:
- Provide the first name:
Platform Admin - Provide the Last name:
OceanSoft - Provide the username:
[email protected] - Leave Primary email as entered
- Choose the Groups as
Okta-AWS-PowerUserAccess - For Password, Choose
I will set passwordand enter a password - Uncheck the
User must change password on first login
- Provide the first name:
- Click on the
Savebutton Okta Add User page
- Navigate to the Applications section on the left-hand side of the page.
- Click Browse App Catalog
- Search for
AWS IAM Identity Centerand click Add Integration - Keep the default settings of App Label (
AWS IAM Identity Center) and Application Visibility. In the application Wizard page for the Application: Click Done button - Go to Sign On and Copy information from the SAML Metadata section, this will be used in AWS SSO. Under the SAML Signing Certificates section, from the Actions drop-down menu, right-click on View IDP metadata and save the link as
okta_metadata.xmlto a file locally.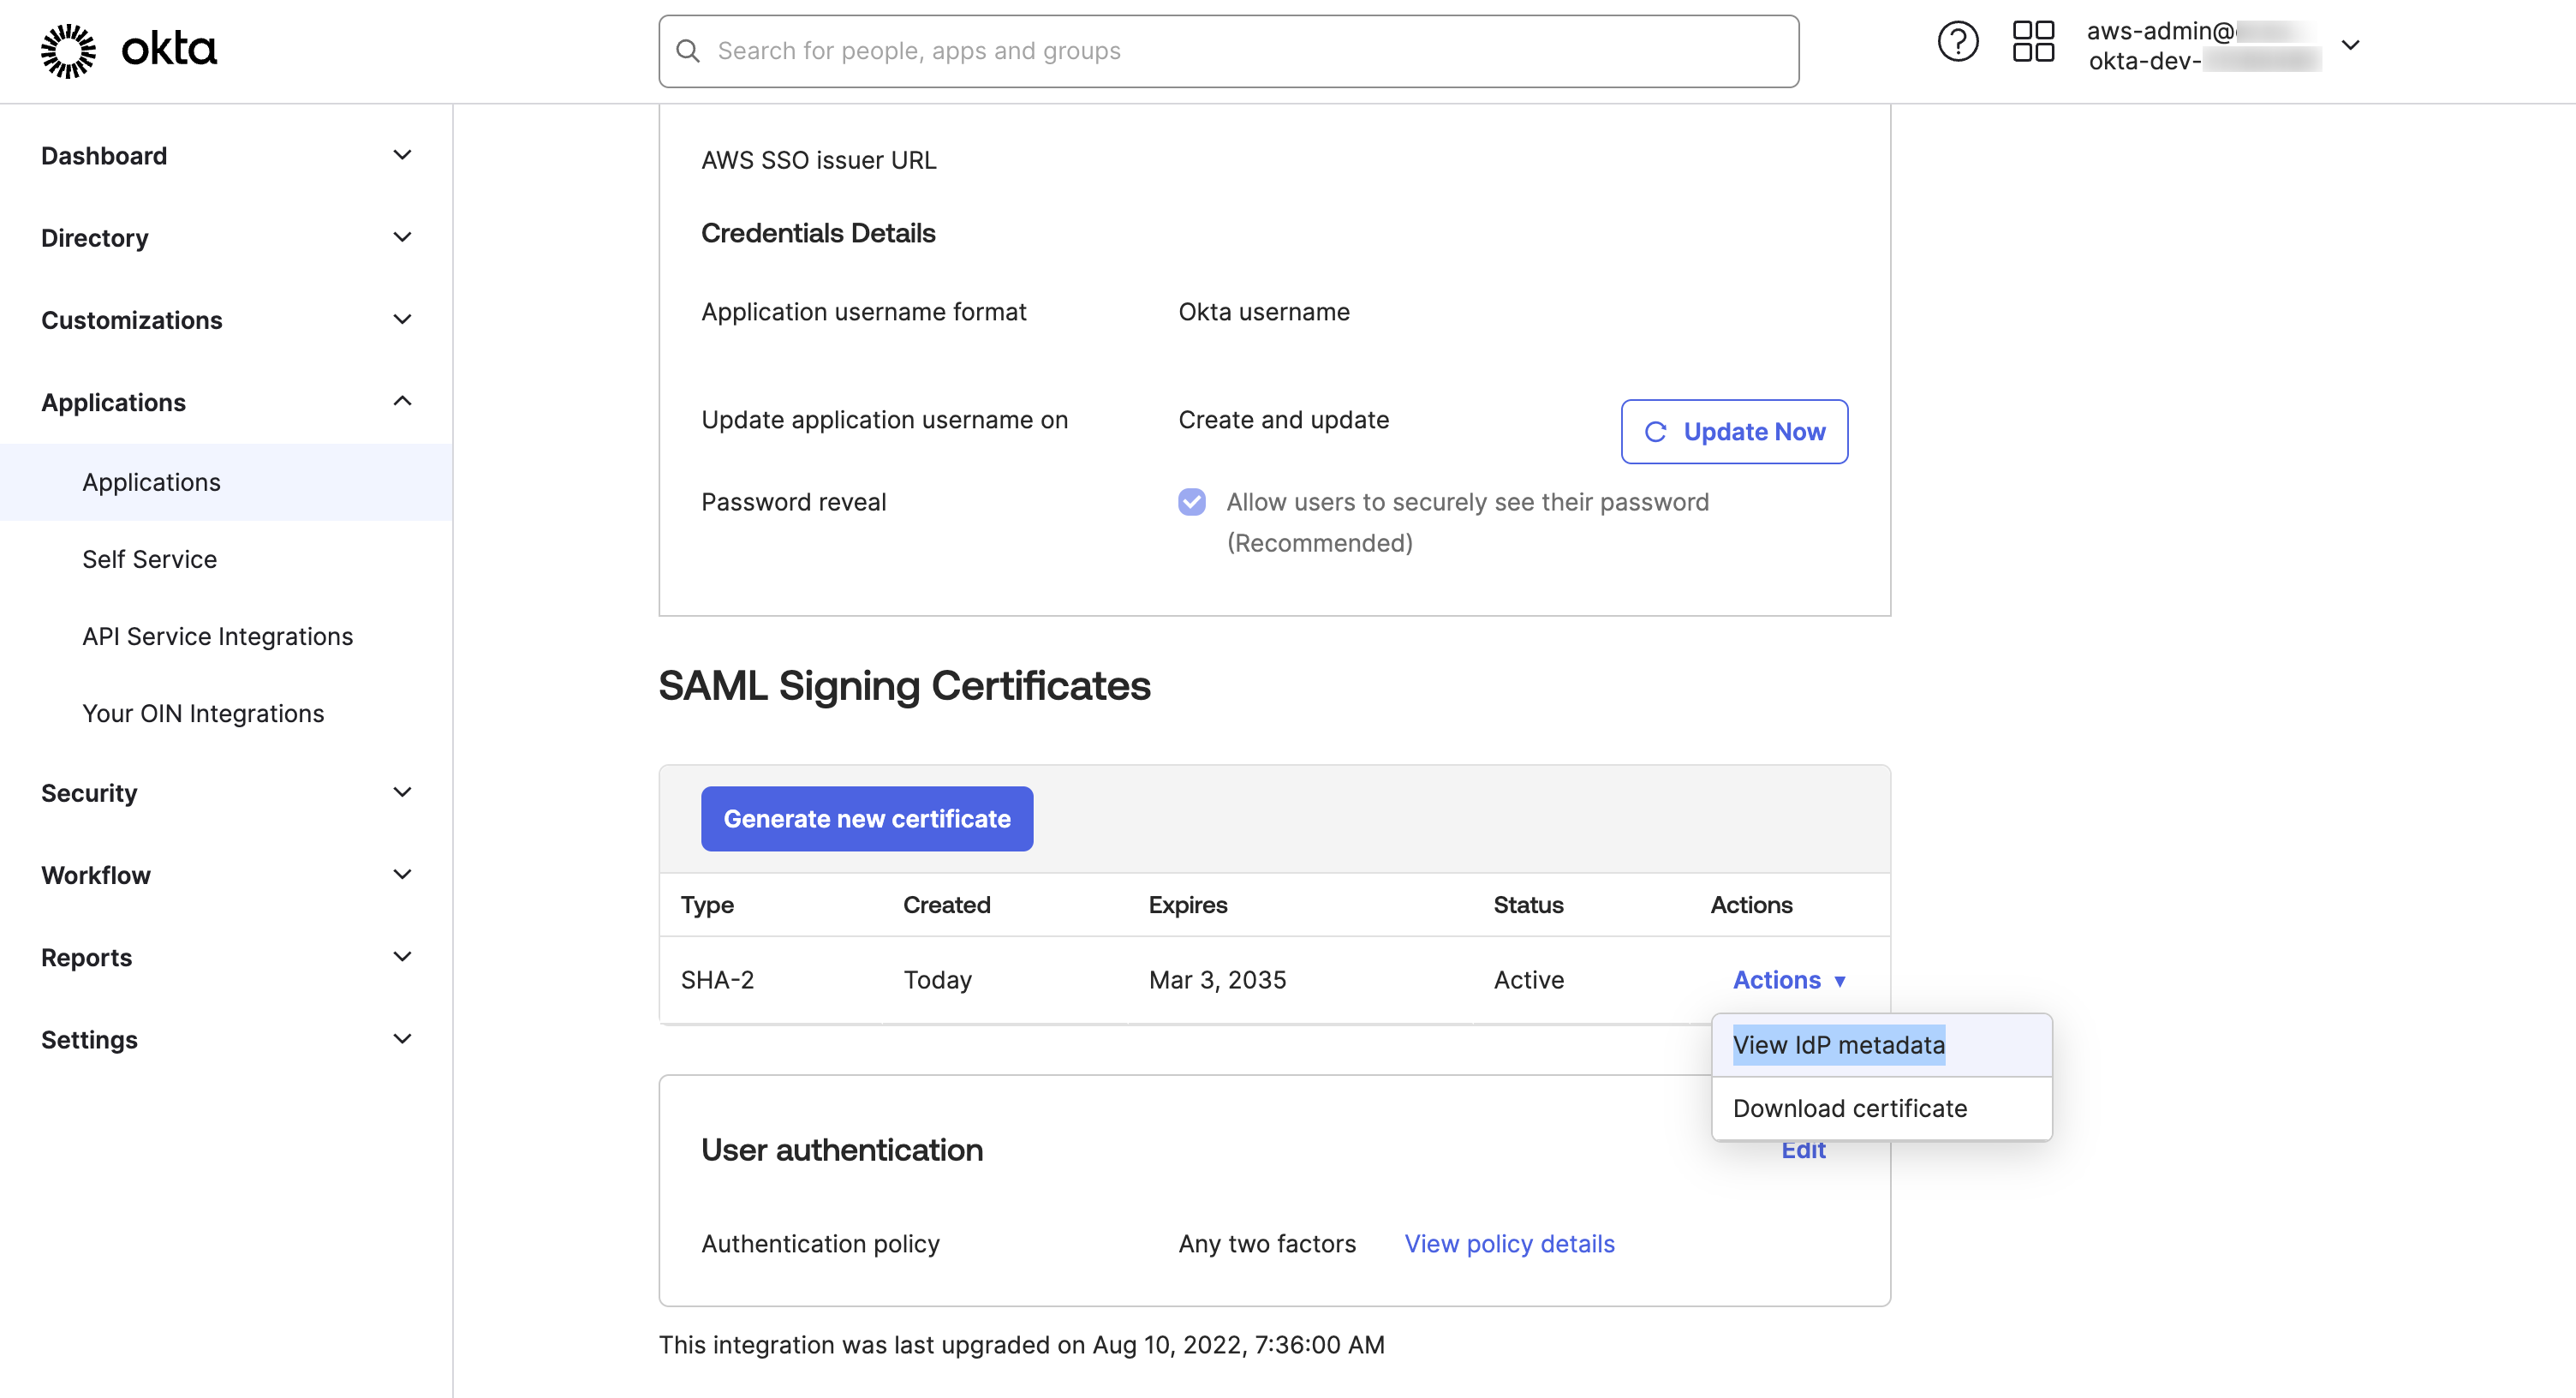
- Sign into the IAM Identity Center Console in your management account with your Identity Center SSO credentials (AWS Region:
<your-aws-region>) - Select Settings from the left menu. In the Setting page, under Identity source tab, Choose Change Identity Source from Actions drop-down menu
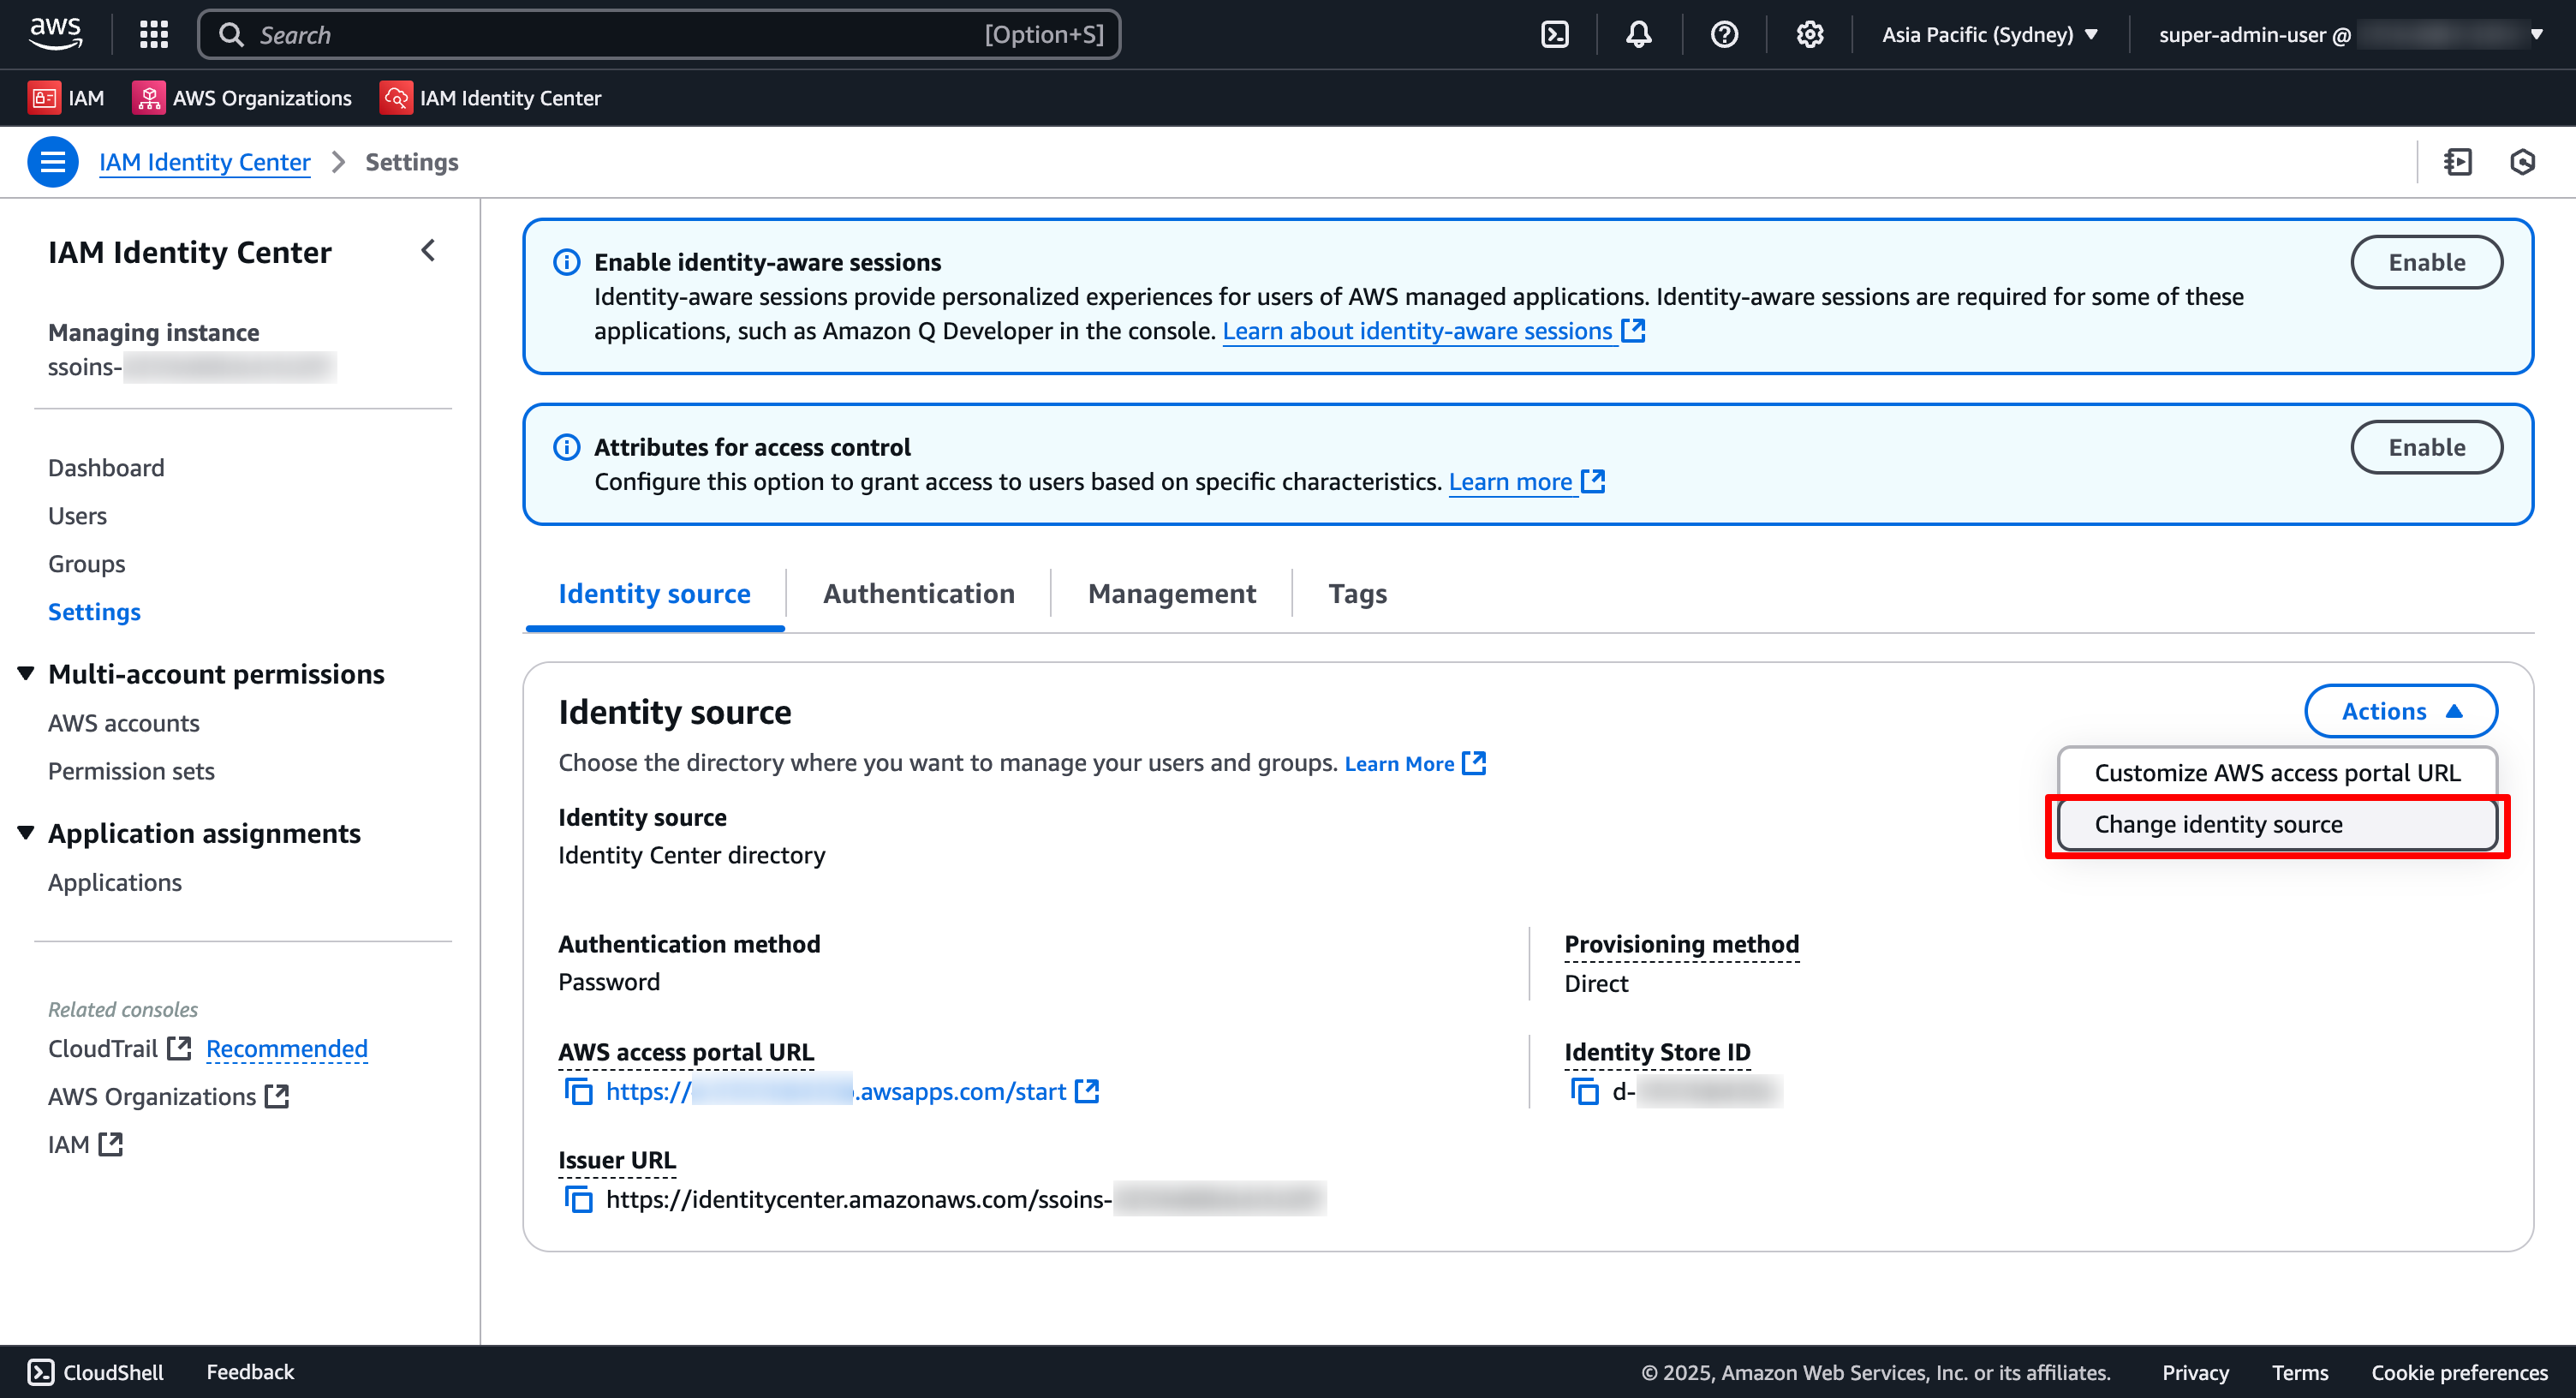
- In the Choose identity source page:
Choose External identity provider, and Click Next
In the Configure external identity provider page: Make a Make a copy of the IAM Identity Center Assertion Consumer Service (ACS) URL, and IAM Identity Center issuer URL values in the Service provider metadata section. These values will be used later on.
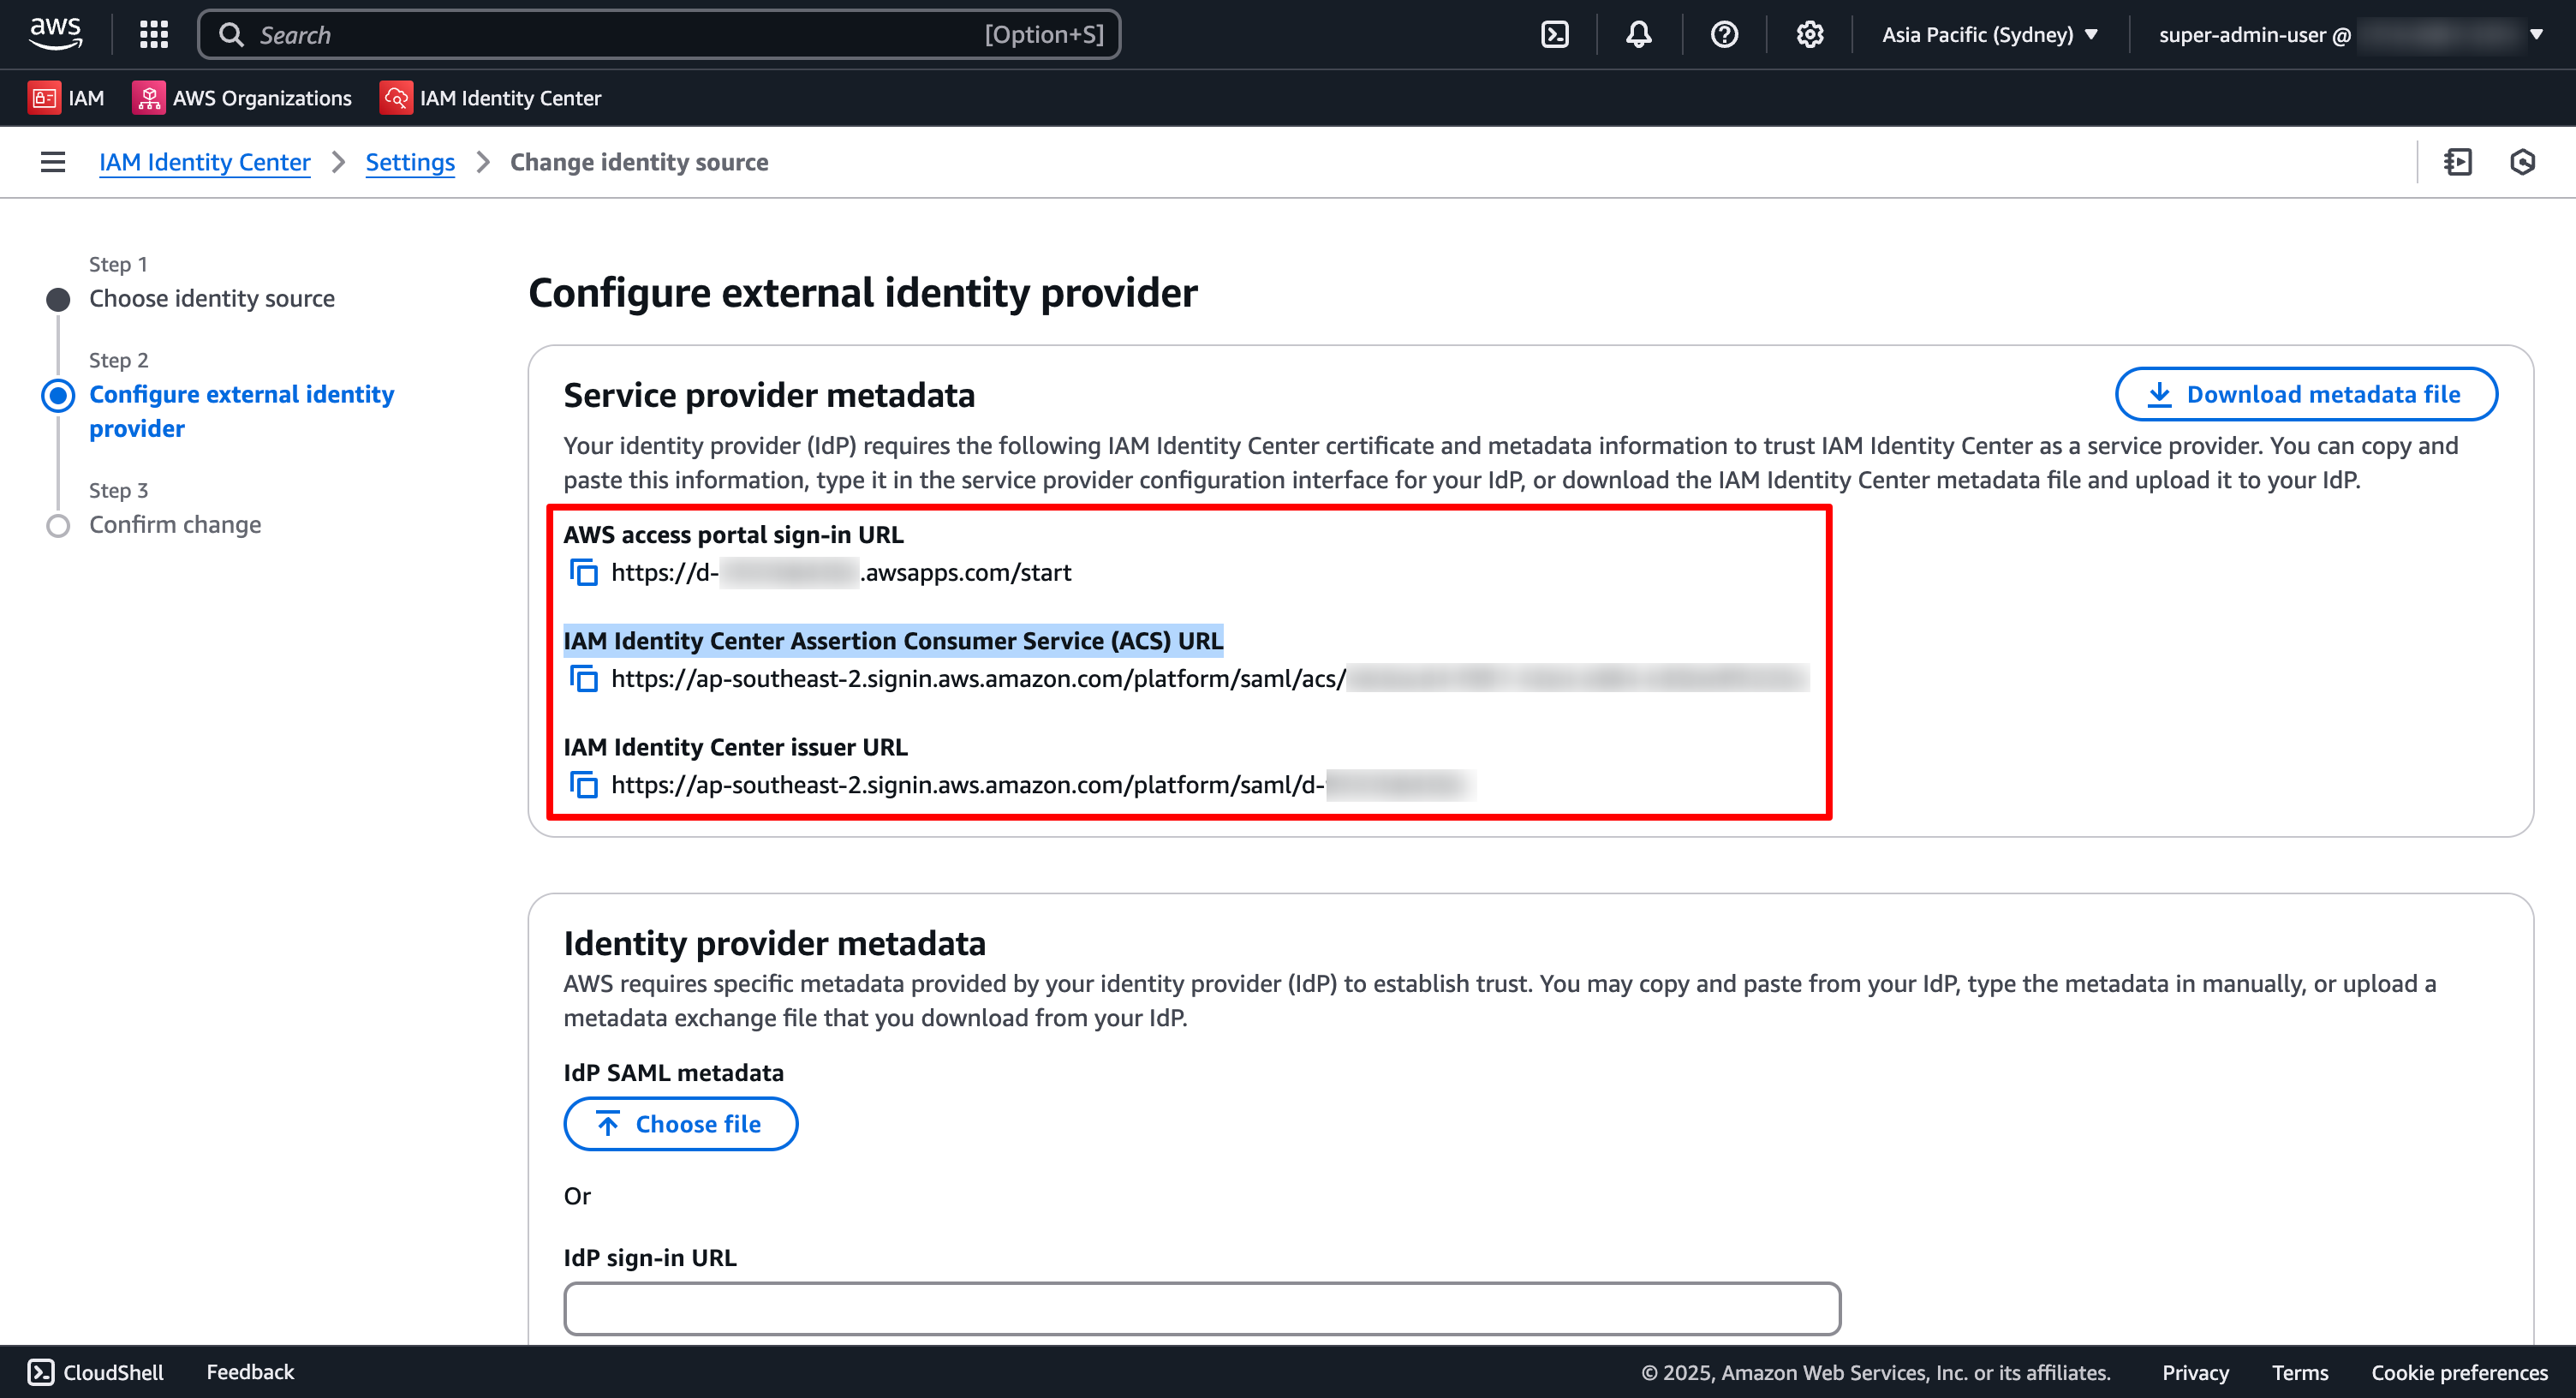
- In the Identity provider metadata section: Click on the Choose file button under IdP SAML metadata label and choose the
okta_metadata.xmlwe saved in the previous step; then Click Next In the Confirm change page: TypeACCEPTand Click on Change identity source
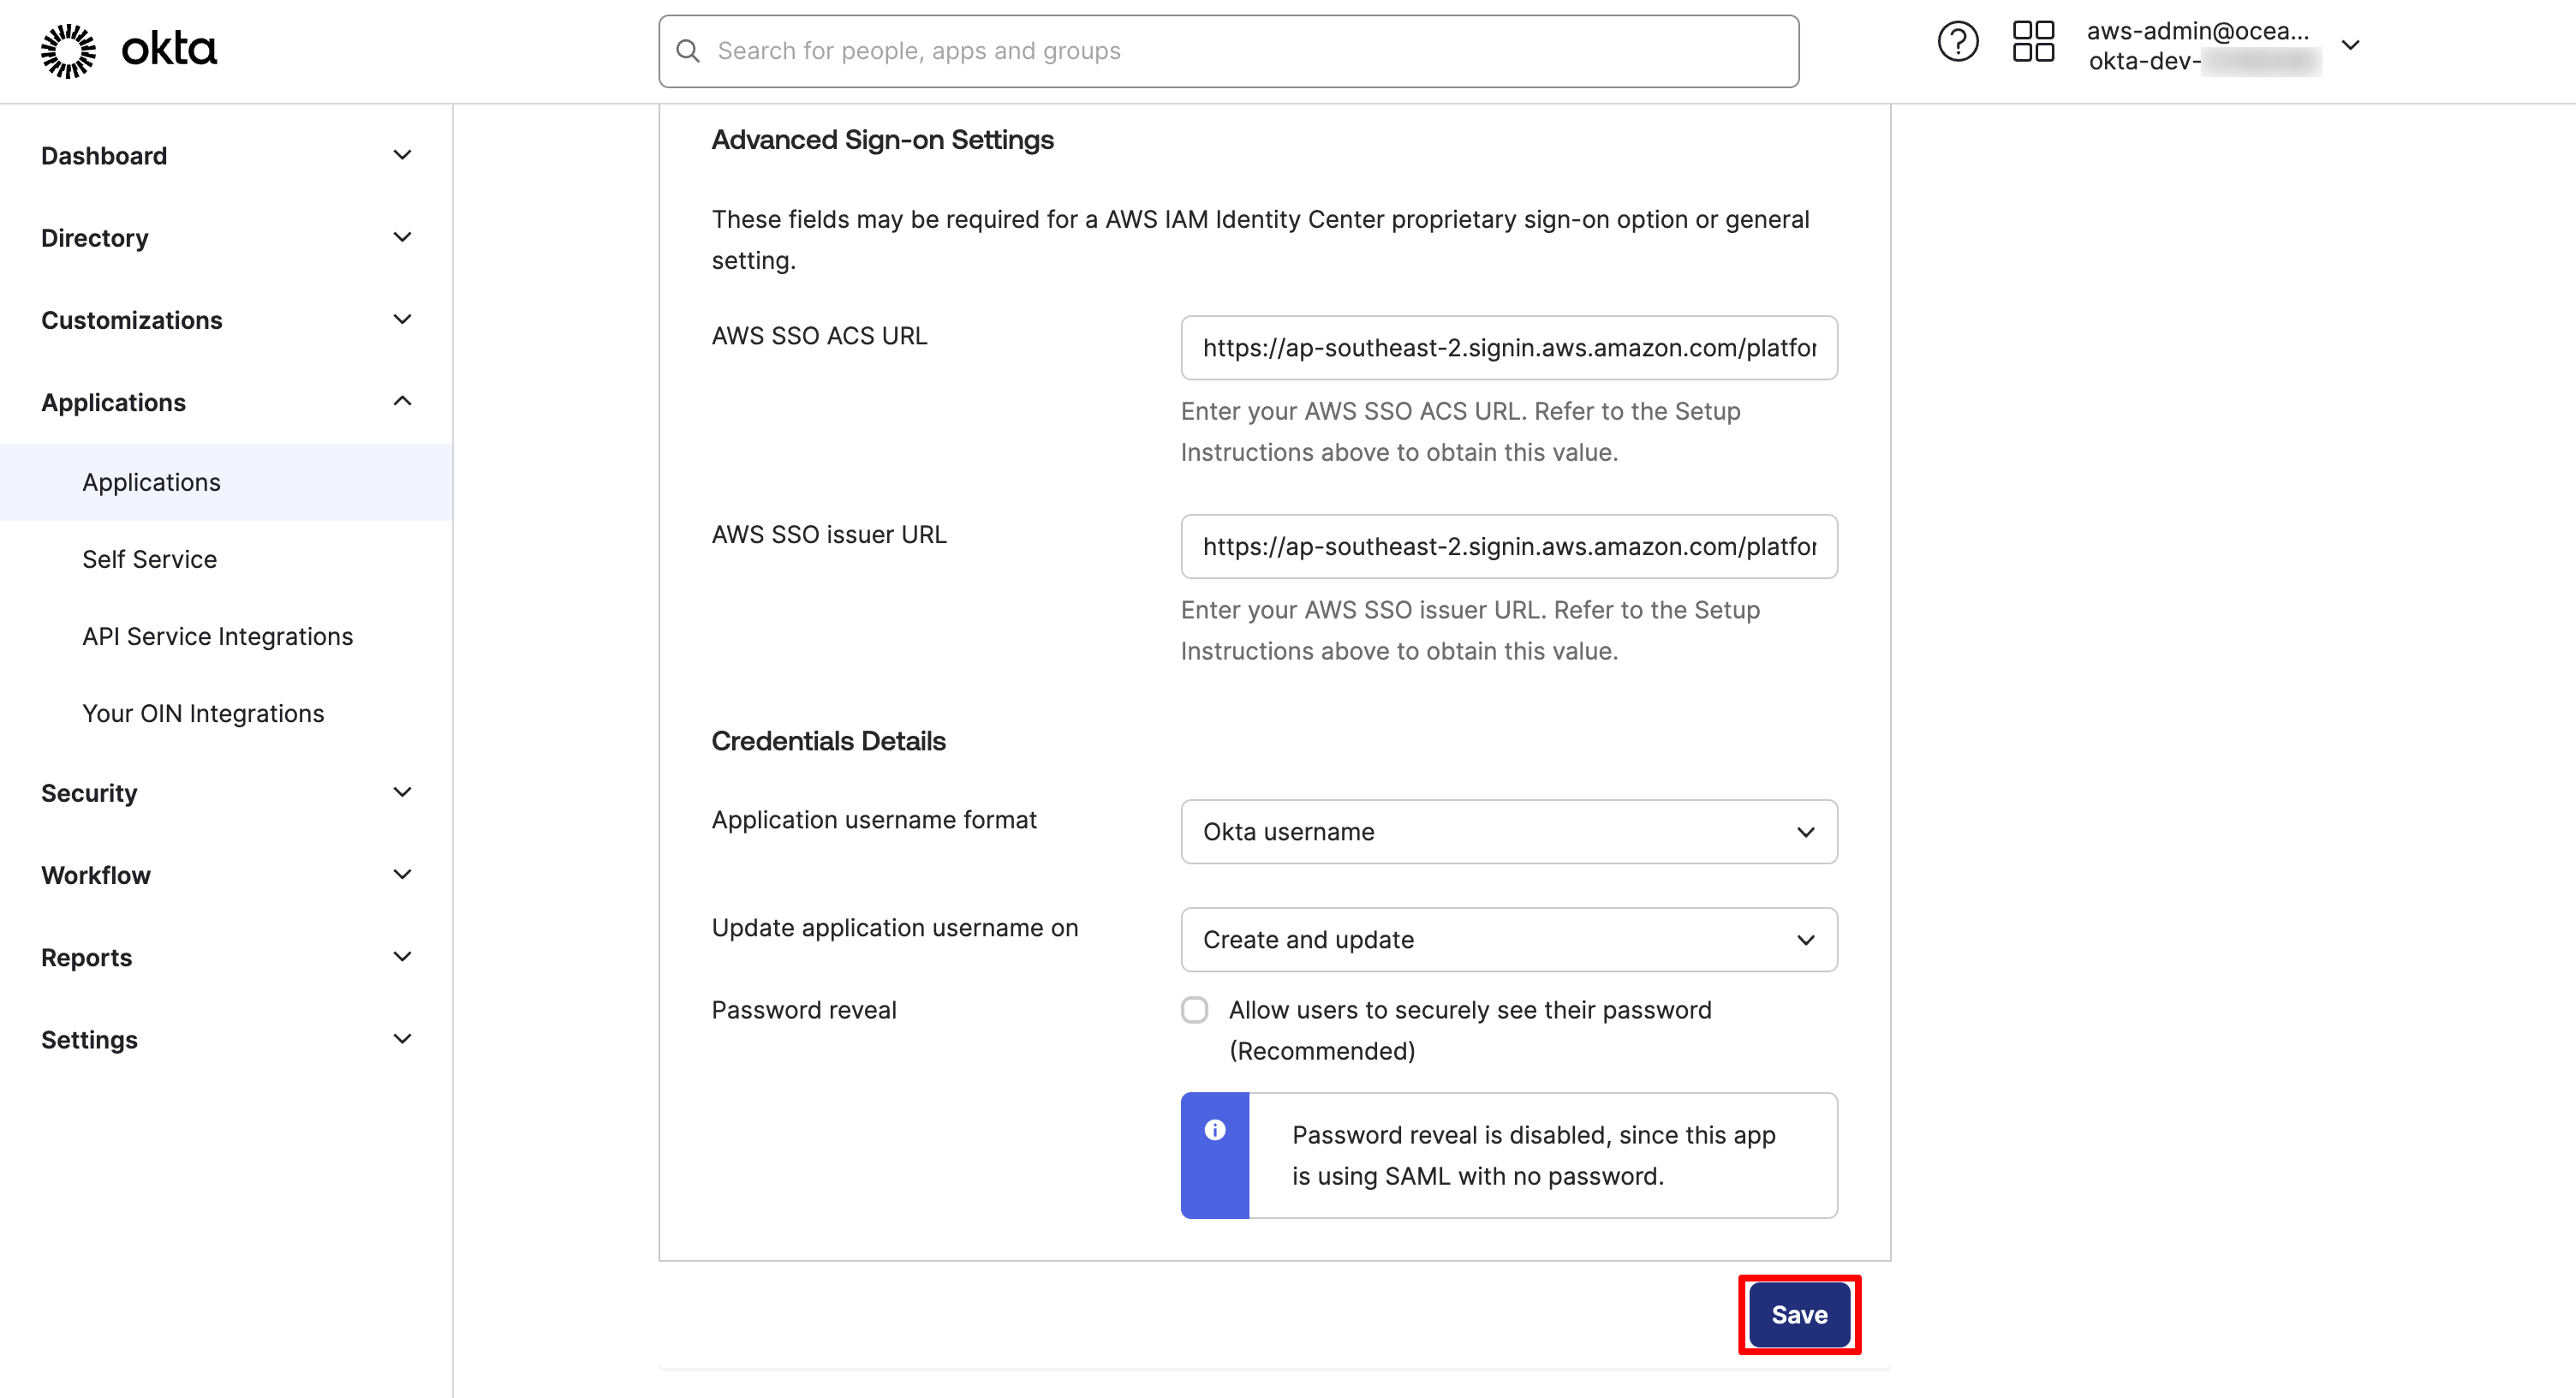
Configure Okta AWS IAM Identity Center >> Sign On configuration:
In the AWS Single Sign-on App page,
- Navigate to the Sign On Tab, click on the Edit button
- Under the Advanced Sign-on Settings section
- Enter your AWS SSO ACS URL:
IAM Identity Center Assertion Consumer Service (ACS) URLand AWS SSO issuer URL:IAM Identity Center issuer URLvalues you made a copy in Step 4 in previous section - Leave the Credentials Details Configuration as to default selections
- Click Save
- Enter your AWS SSO ACS URL:
In this section, you will configure SCIM to enable the users and groups from Okta to be automatically sync'ed into the Identity Center.
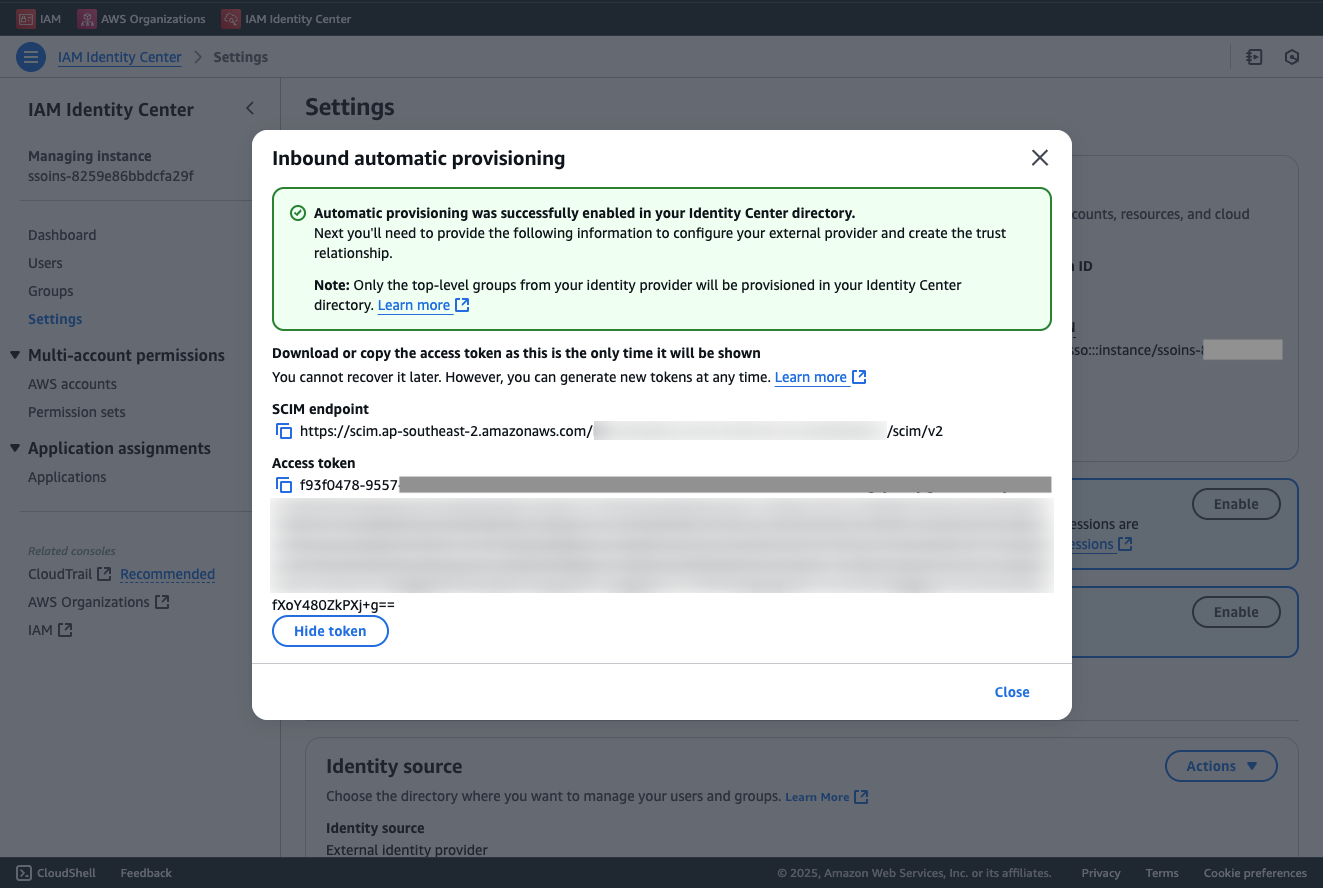
6.1. ⛅️ In AWS Identity Center Console:
- Navigate to the IAM Identity Center Console
- Select Settings from the left menu
- In the Setting page, Click on
Enablewithin the Automatic provisioning info block - In the Inbound automatic provisioning dialog, Copy the SCIM endpoint and the Access token, we will use it to configure it within the Okta admin dashboard.
6.2. 🛡️ In Okta Admin Dashboard:
- Navigate to the Provisioning tab within the Okta's IAM Identity Center Application
- Click on Configure API Integration Okta SSO SCIM page:
Select the checkbox for Enable API integration.
Provide the Base URL value with the
SCIM endpointcopied from Step 6.1 in the previous section. When you copy the URL, make sure there is no “/” at the end or link validation in Okta will fail. Provide API Token value with theAccess tokencopied from Step 6.1 in the previous section. Click Test API Credentials to test the end-point. You will see a green banner with message "AWS IAM Identity Center was verified successfully!" Click Save to Save the configuration Okta SSO SCIM page.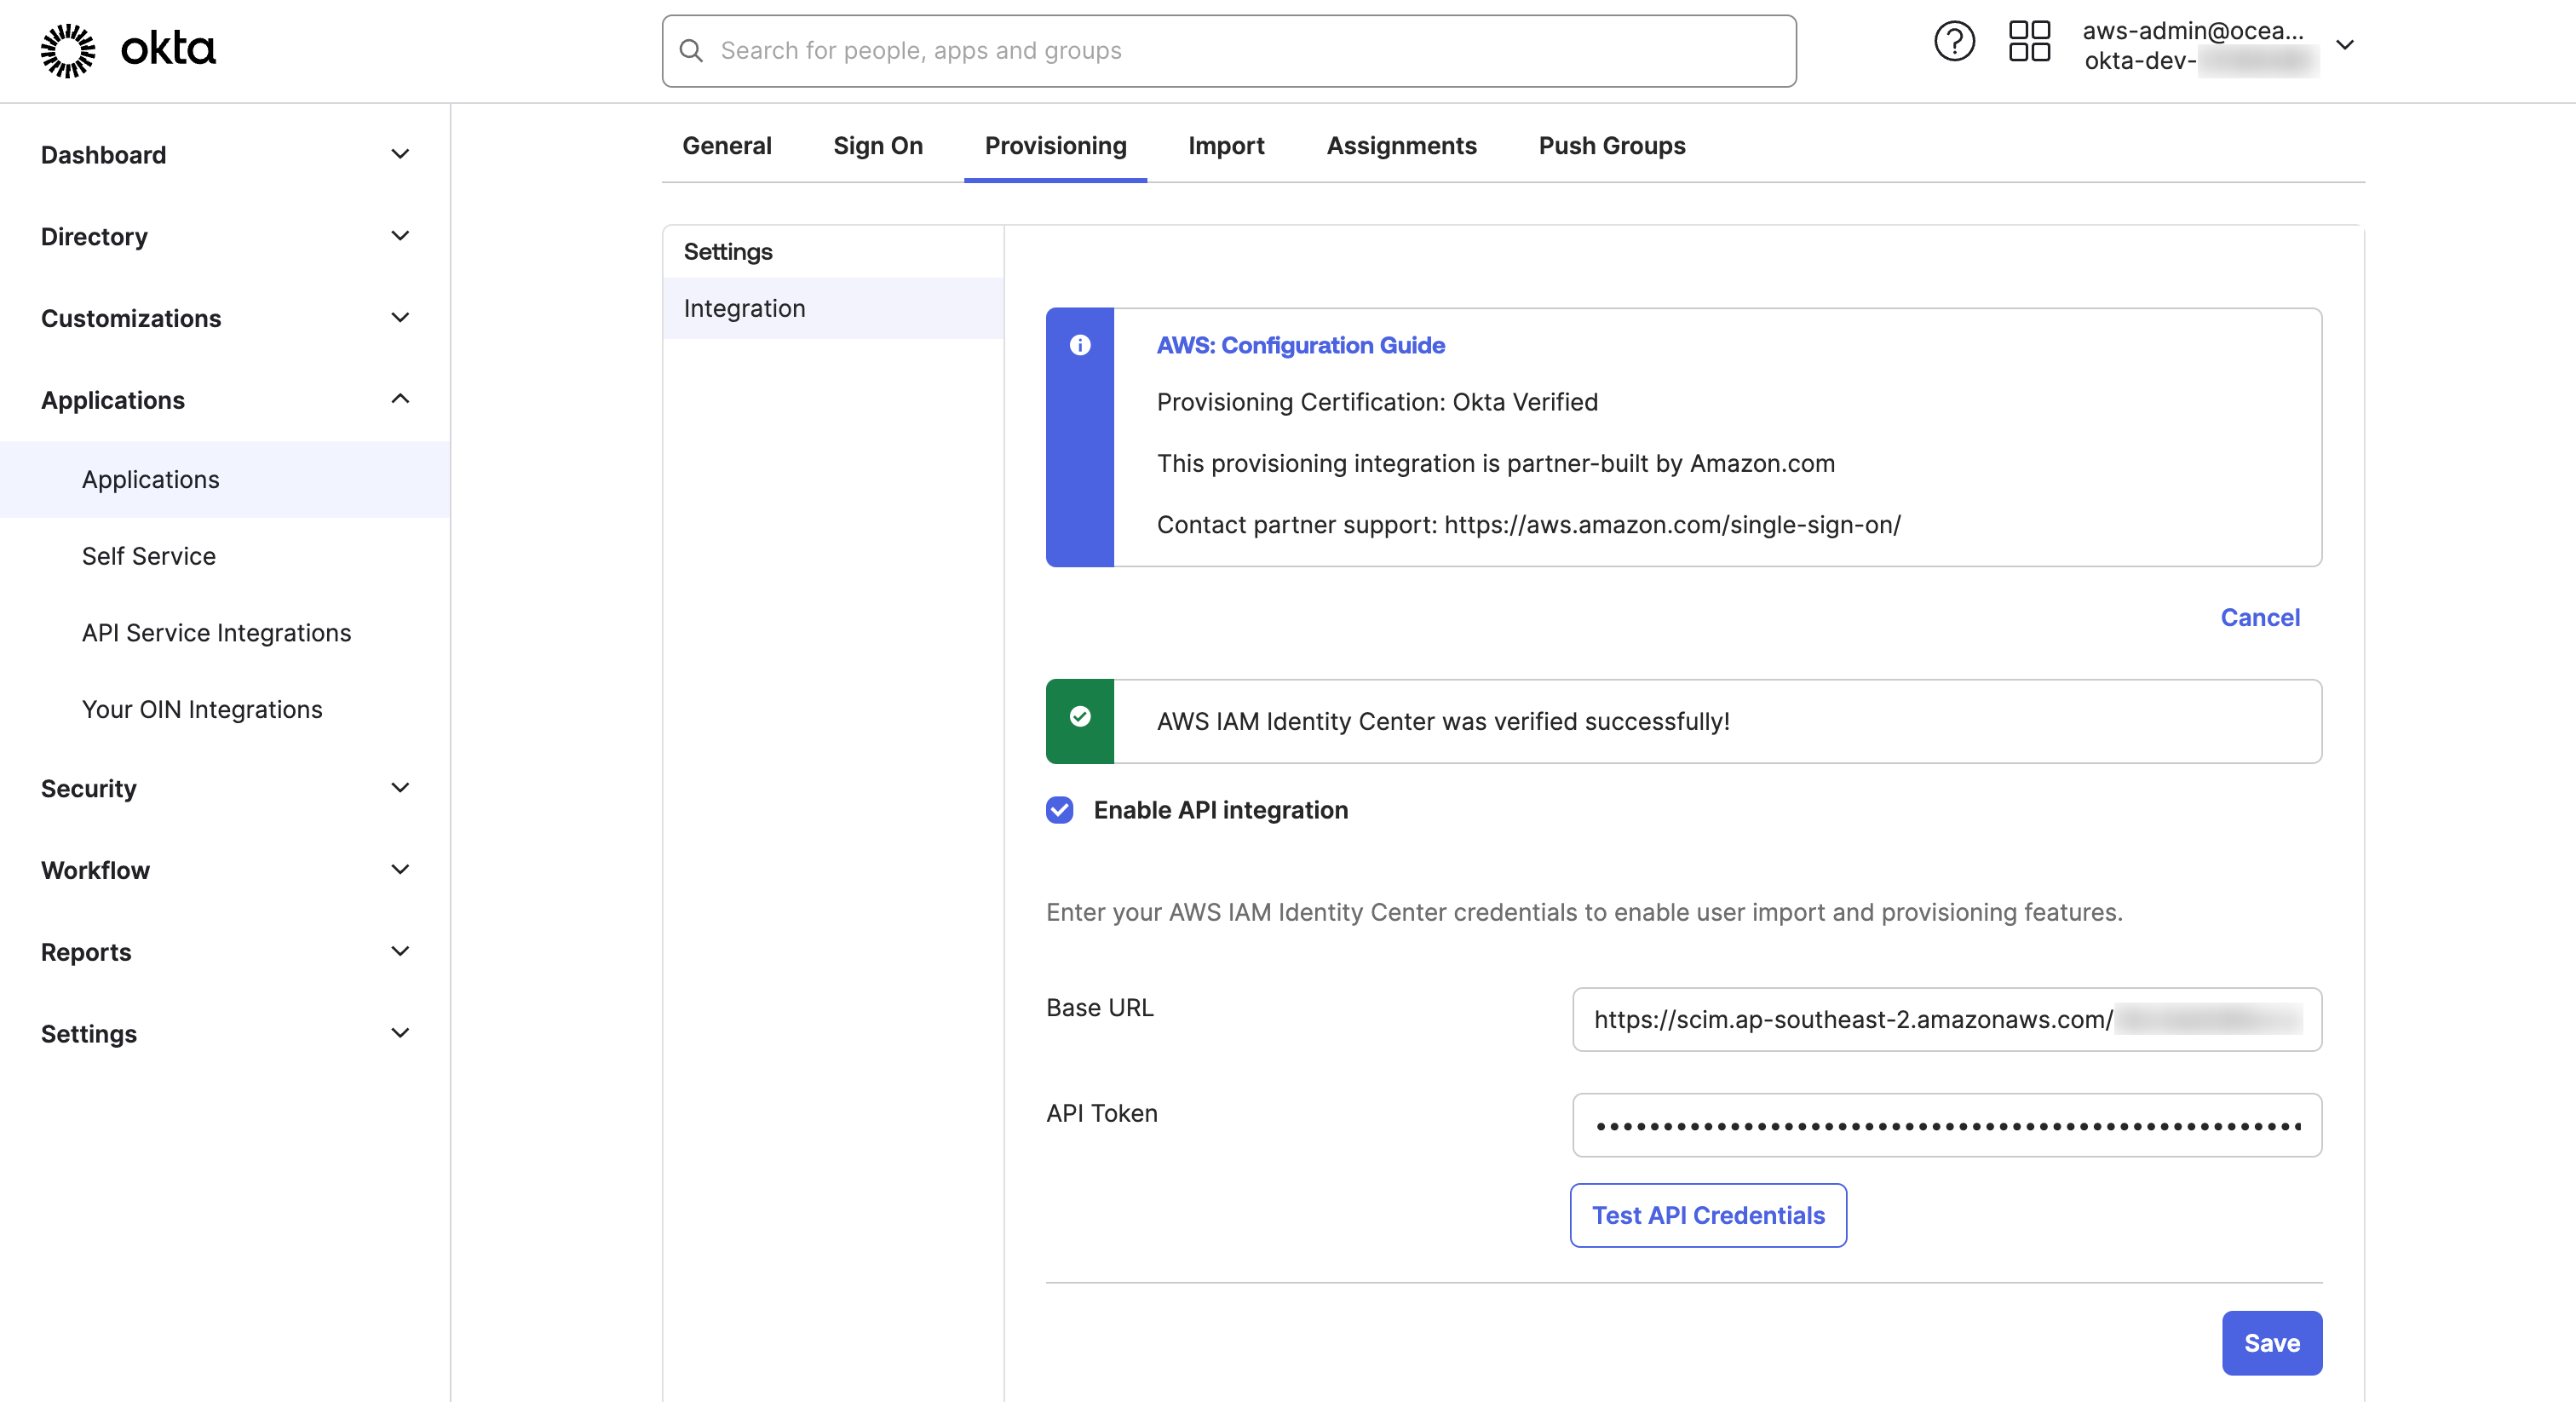
- In the Provisioning tab make sure that To App is selected.
Click on Edit
Select Enable for
Create Users,Update User Attributes, andDeactivate Users. Click on Save.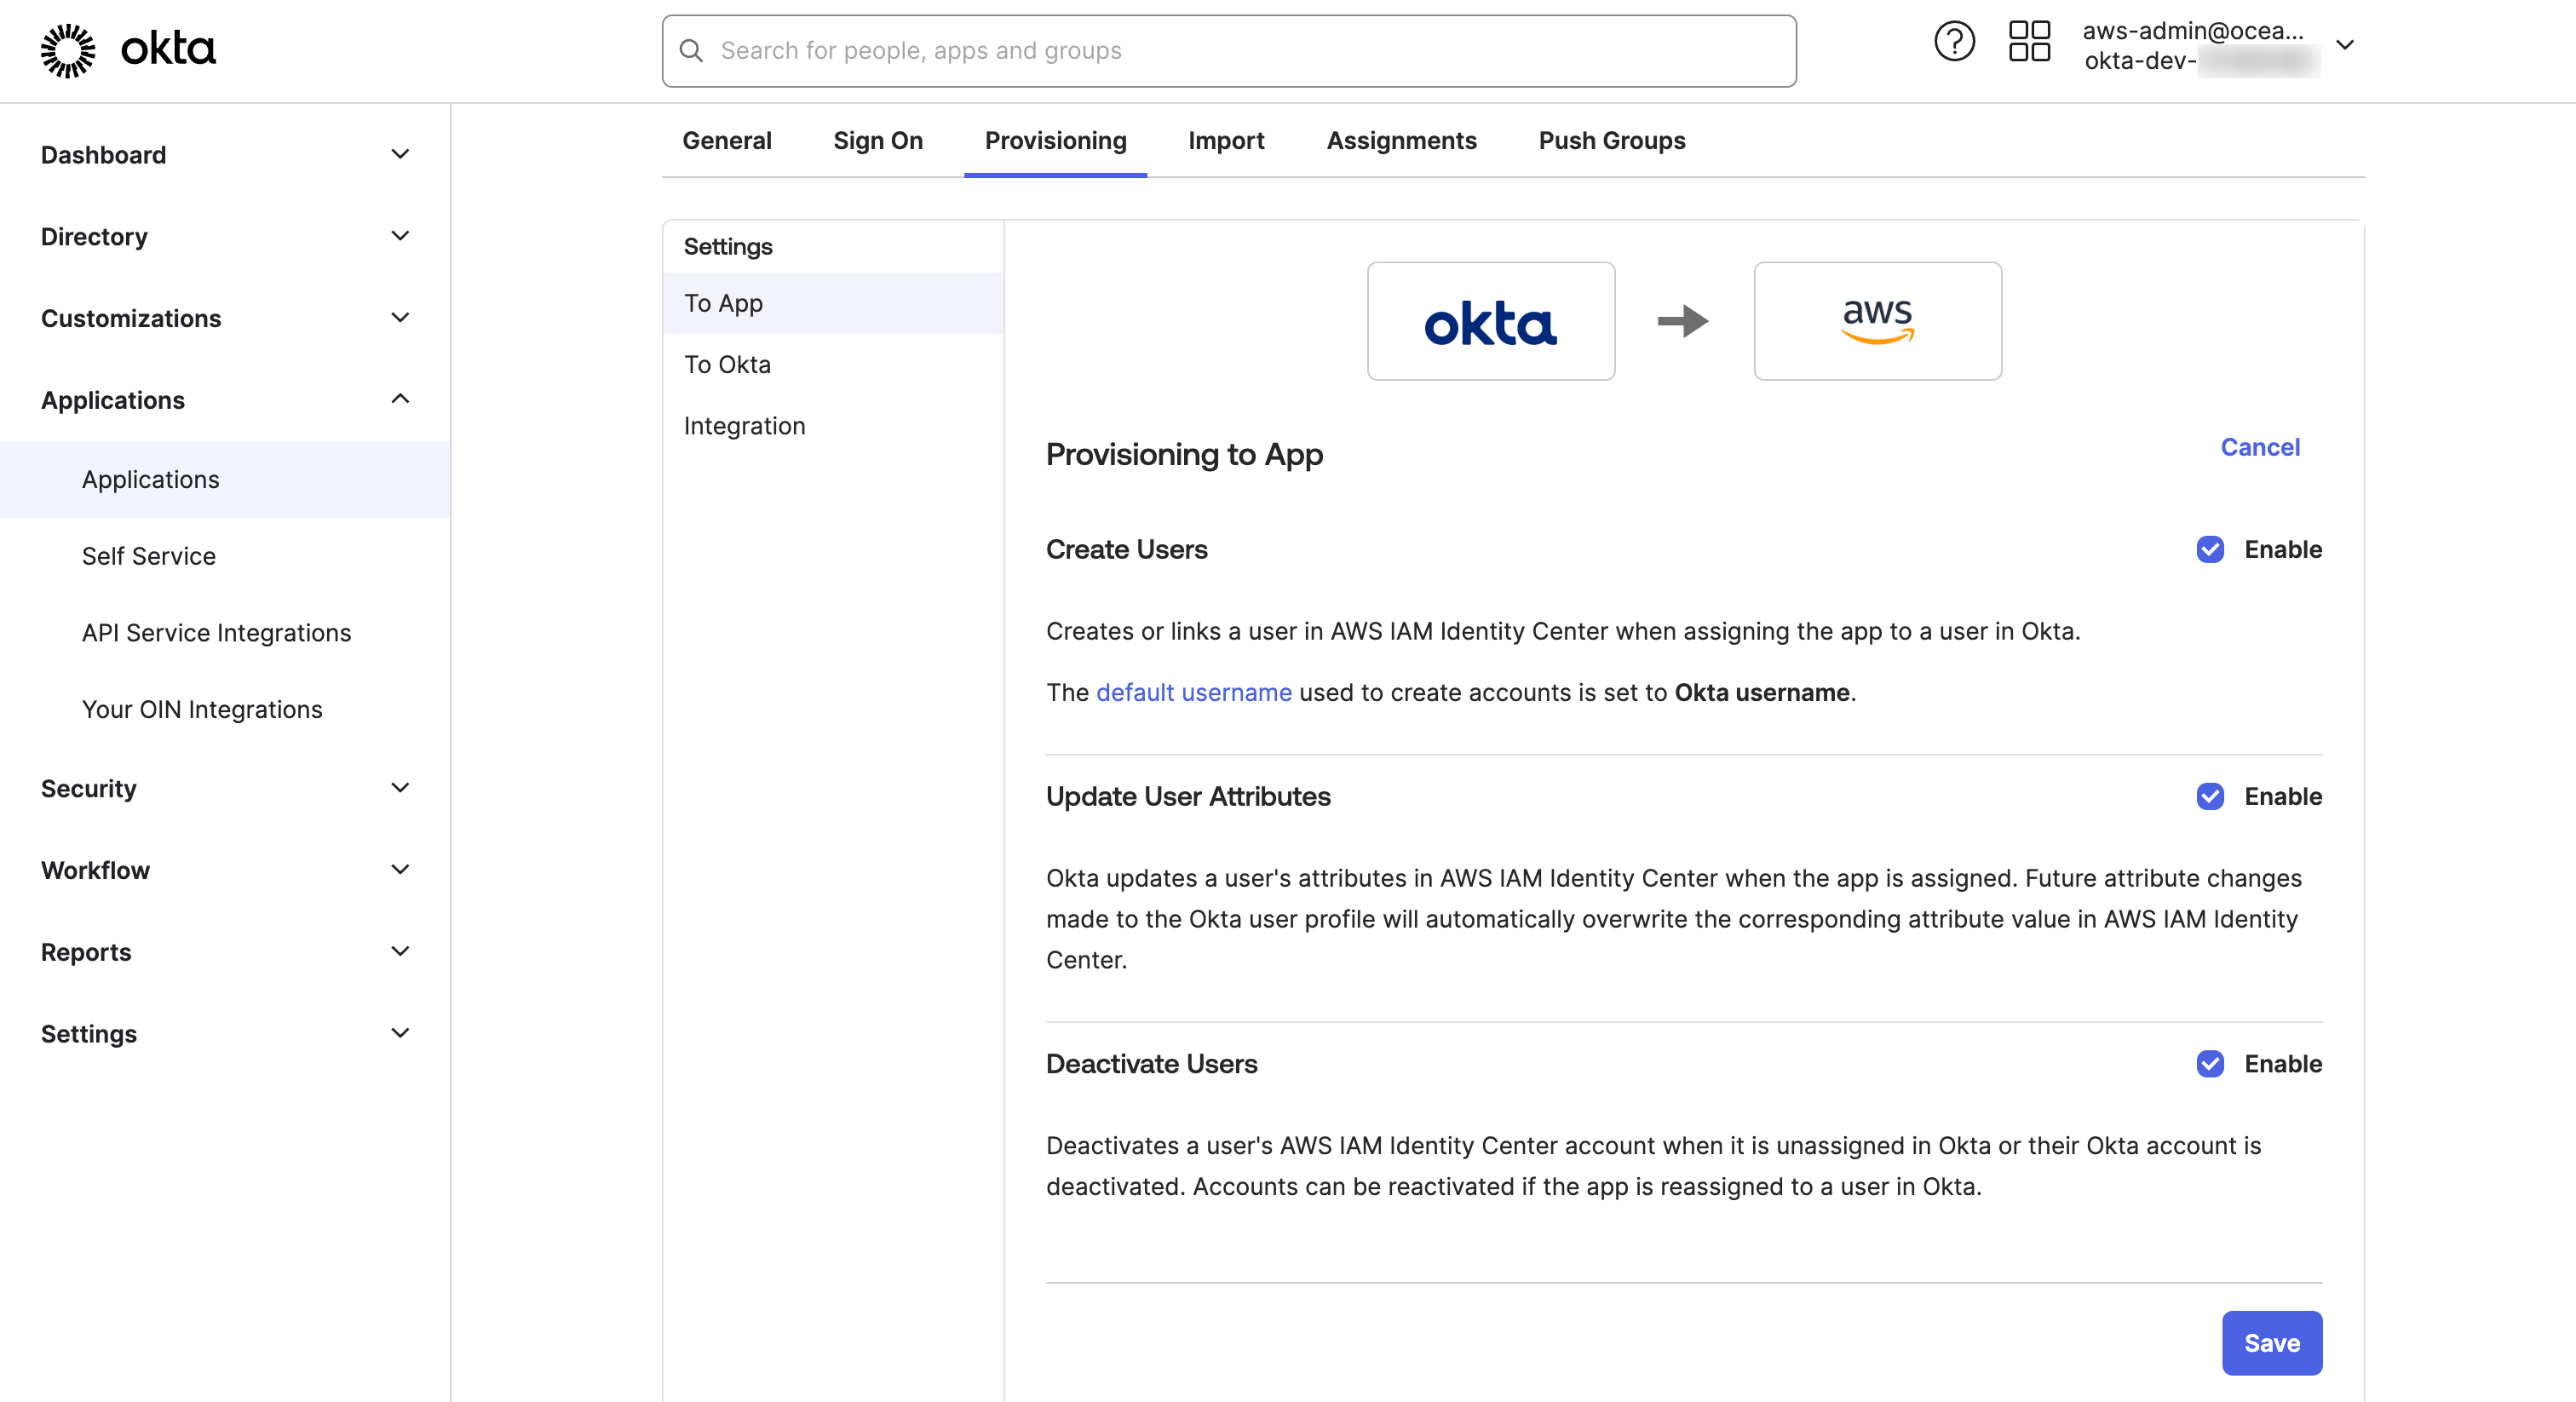
To allow users access via SSO, we must assign them to the IAM Identity Center Application in Okta. As soon as you assign a user or group, Okta will call in the background the APIs to create the user in IAM Identity Center. If you change a mapped attribute e.g. FirstName, Okta will update the attribute also in IAM Identity Center. If you unassign a user, it will be deactivated in IAM Identity Center. Okta takes care of the full user life-cycle management.
- 🛡️ In Okta admin dashboard >>
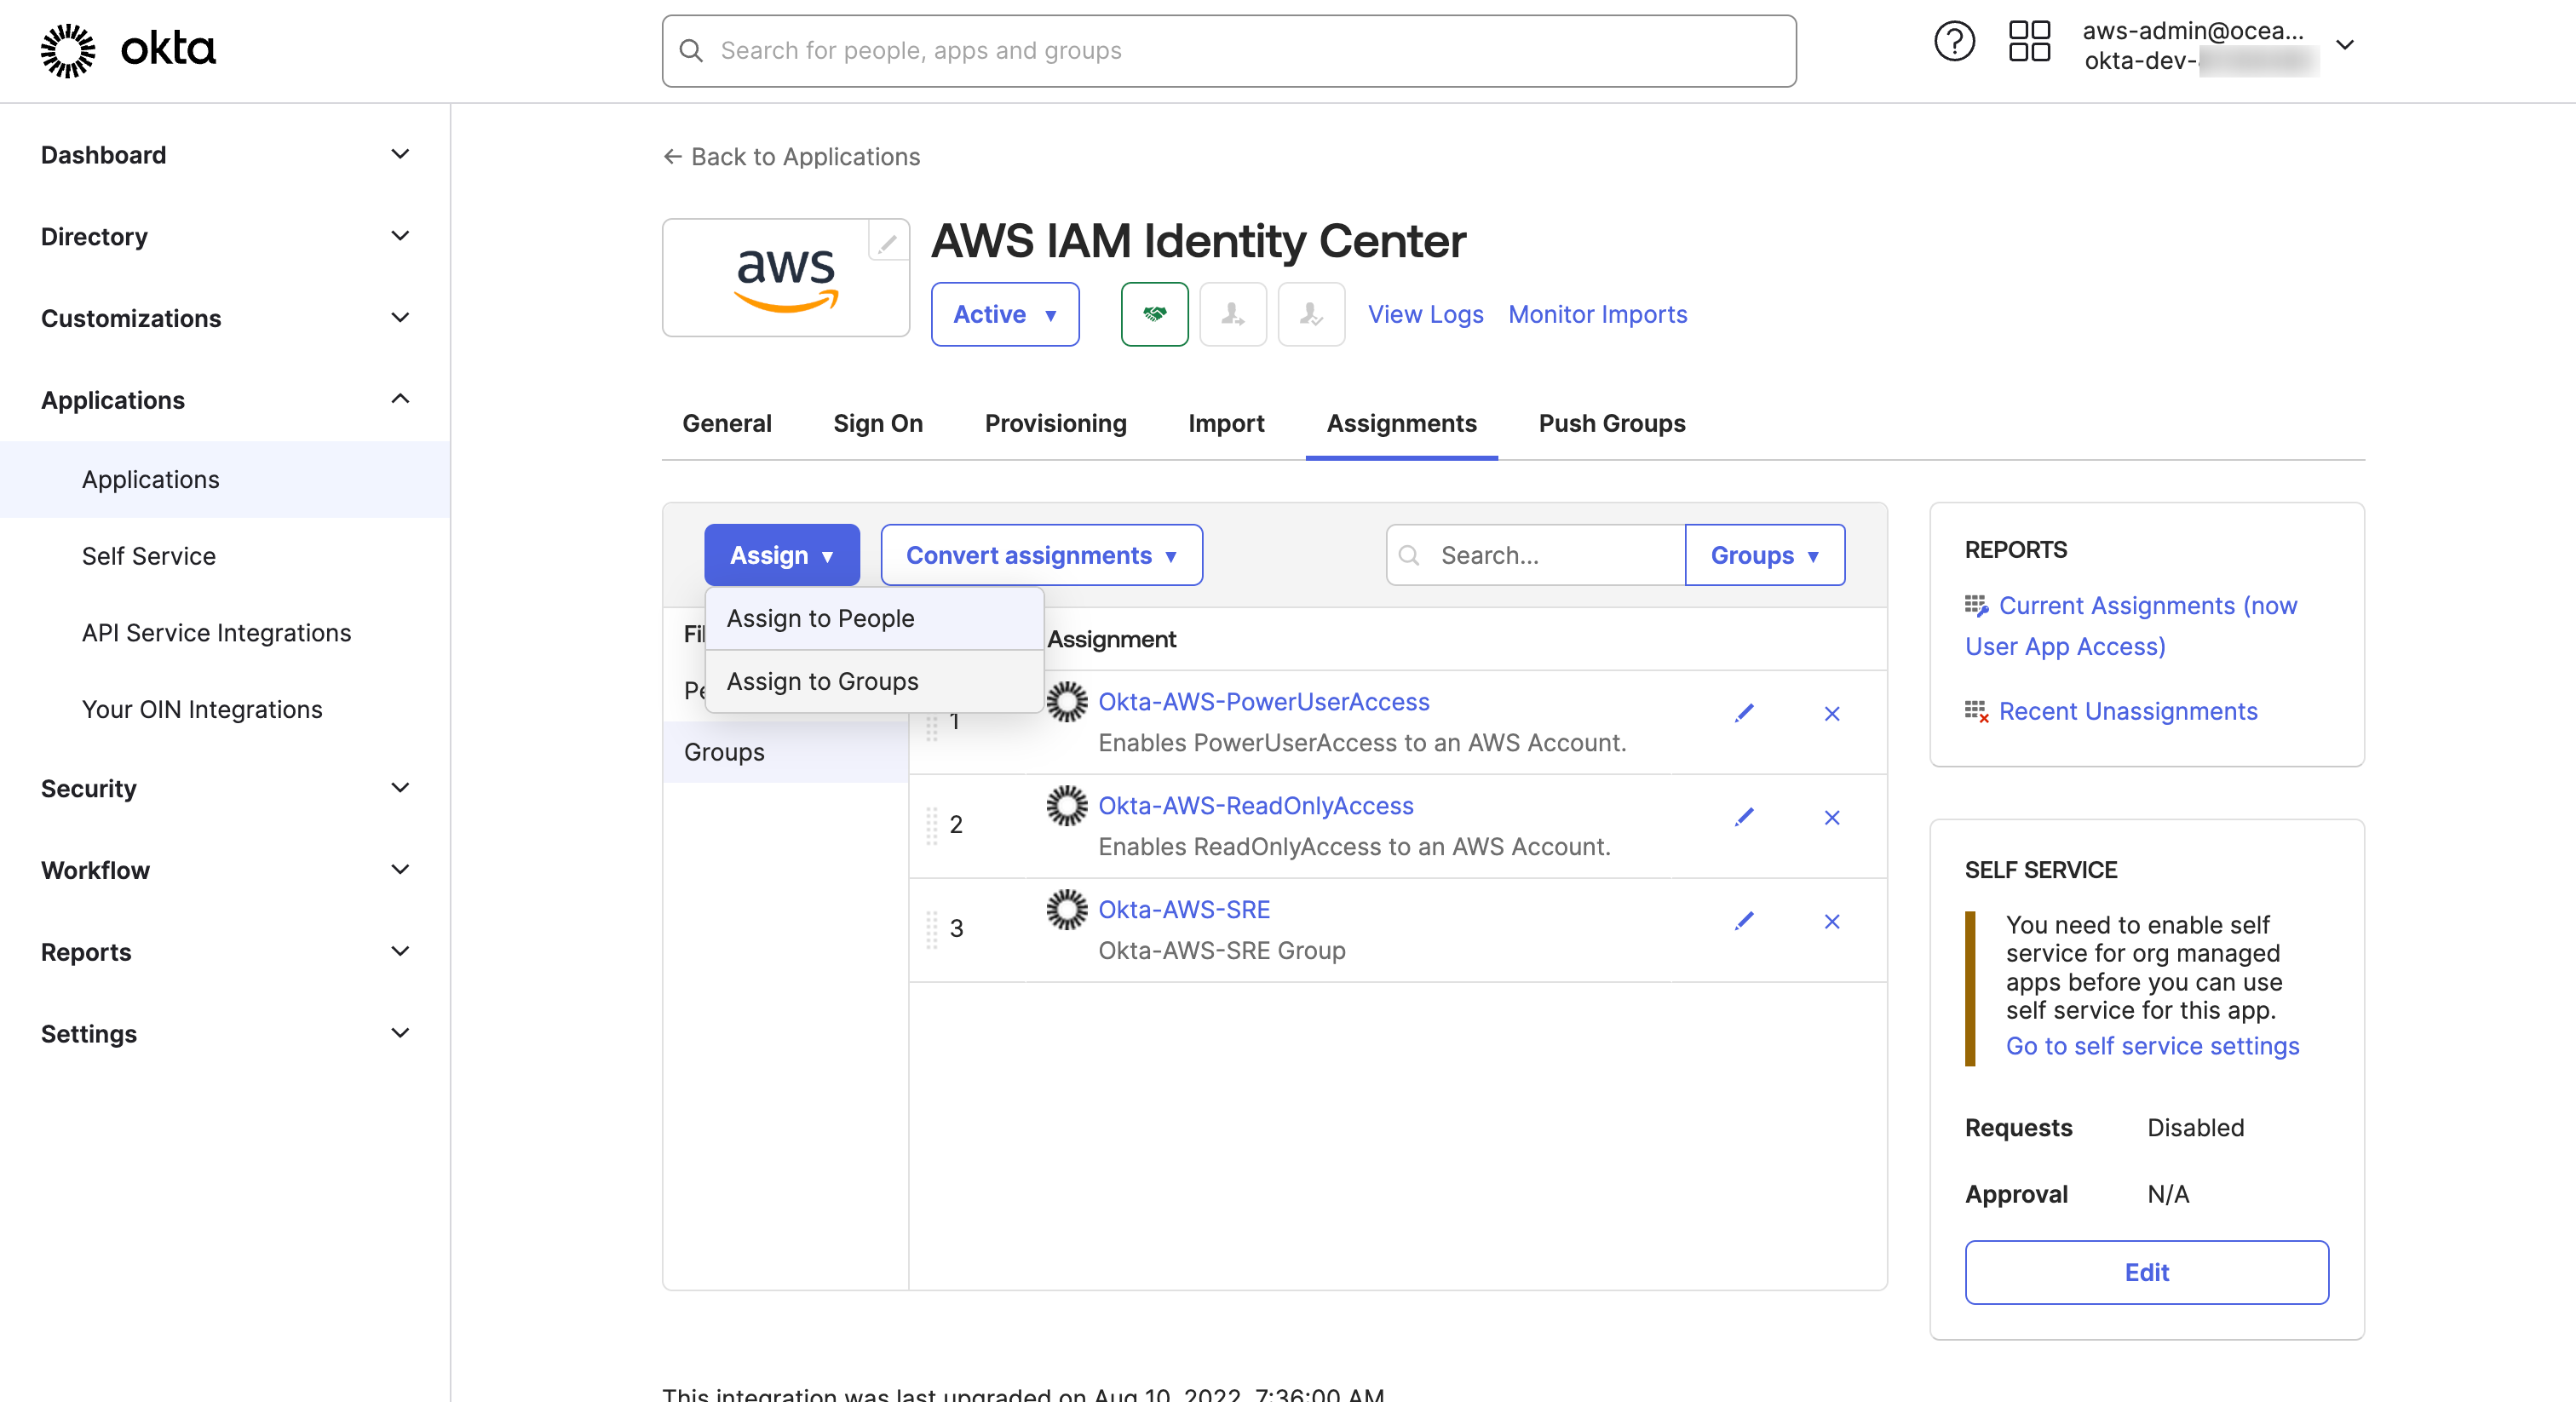
AWS IAM Identity CenterOkta-Applications, Go to Assignment tab and
- Click on Assign to Groups within the Assign pull-down button Okta assignment page
- Choose
Okta-AWS-PowerUserAccessgroup and click Assign Okta assignment page. A dialog will appear to do additional attribute mapping per group. No changes are required, select Save and Go Back - Click Done on Assignment dialog Okta assignment page
IAM Identity Center doesn�’t know about Okta groups yet. We will use the groups to map the Permission Sets in IAM Identity Center. Let’s push the groups and their memberships to IAM Identity Center.
- 🛡️ In Okta admin dashboard, Go to Push Groups tab and
- Click Find groups by name from the Push Groups pull-down button Okta push groups page.
- Search for
Okta-AWS-PowerUserAccessgroup and Click on Save - After few seconds, you should see the Push Status as
Activein Push Groups to AWS IAM Identity Center page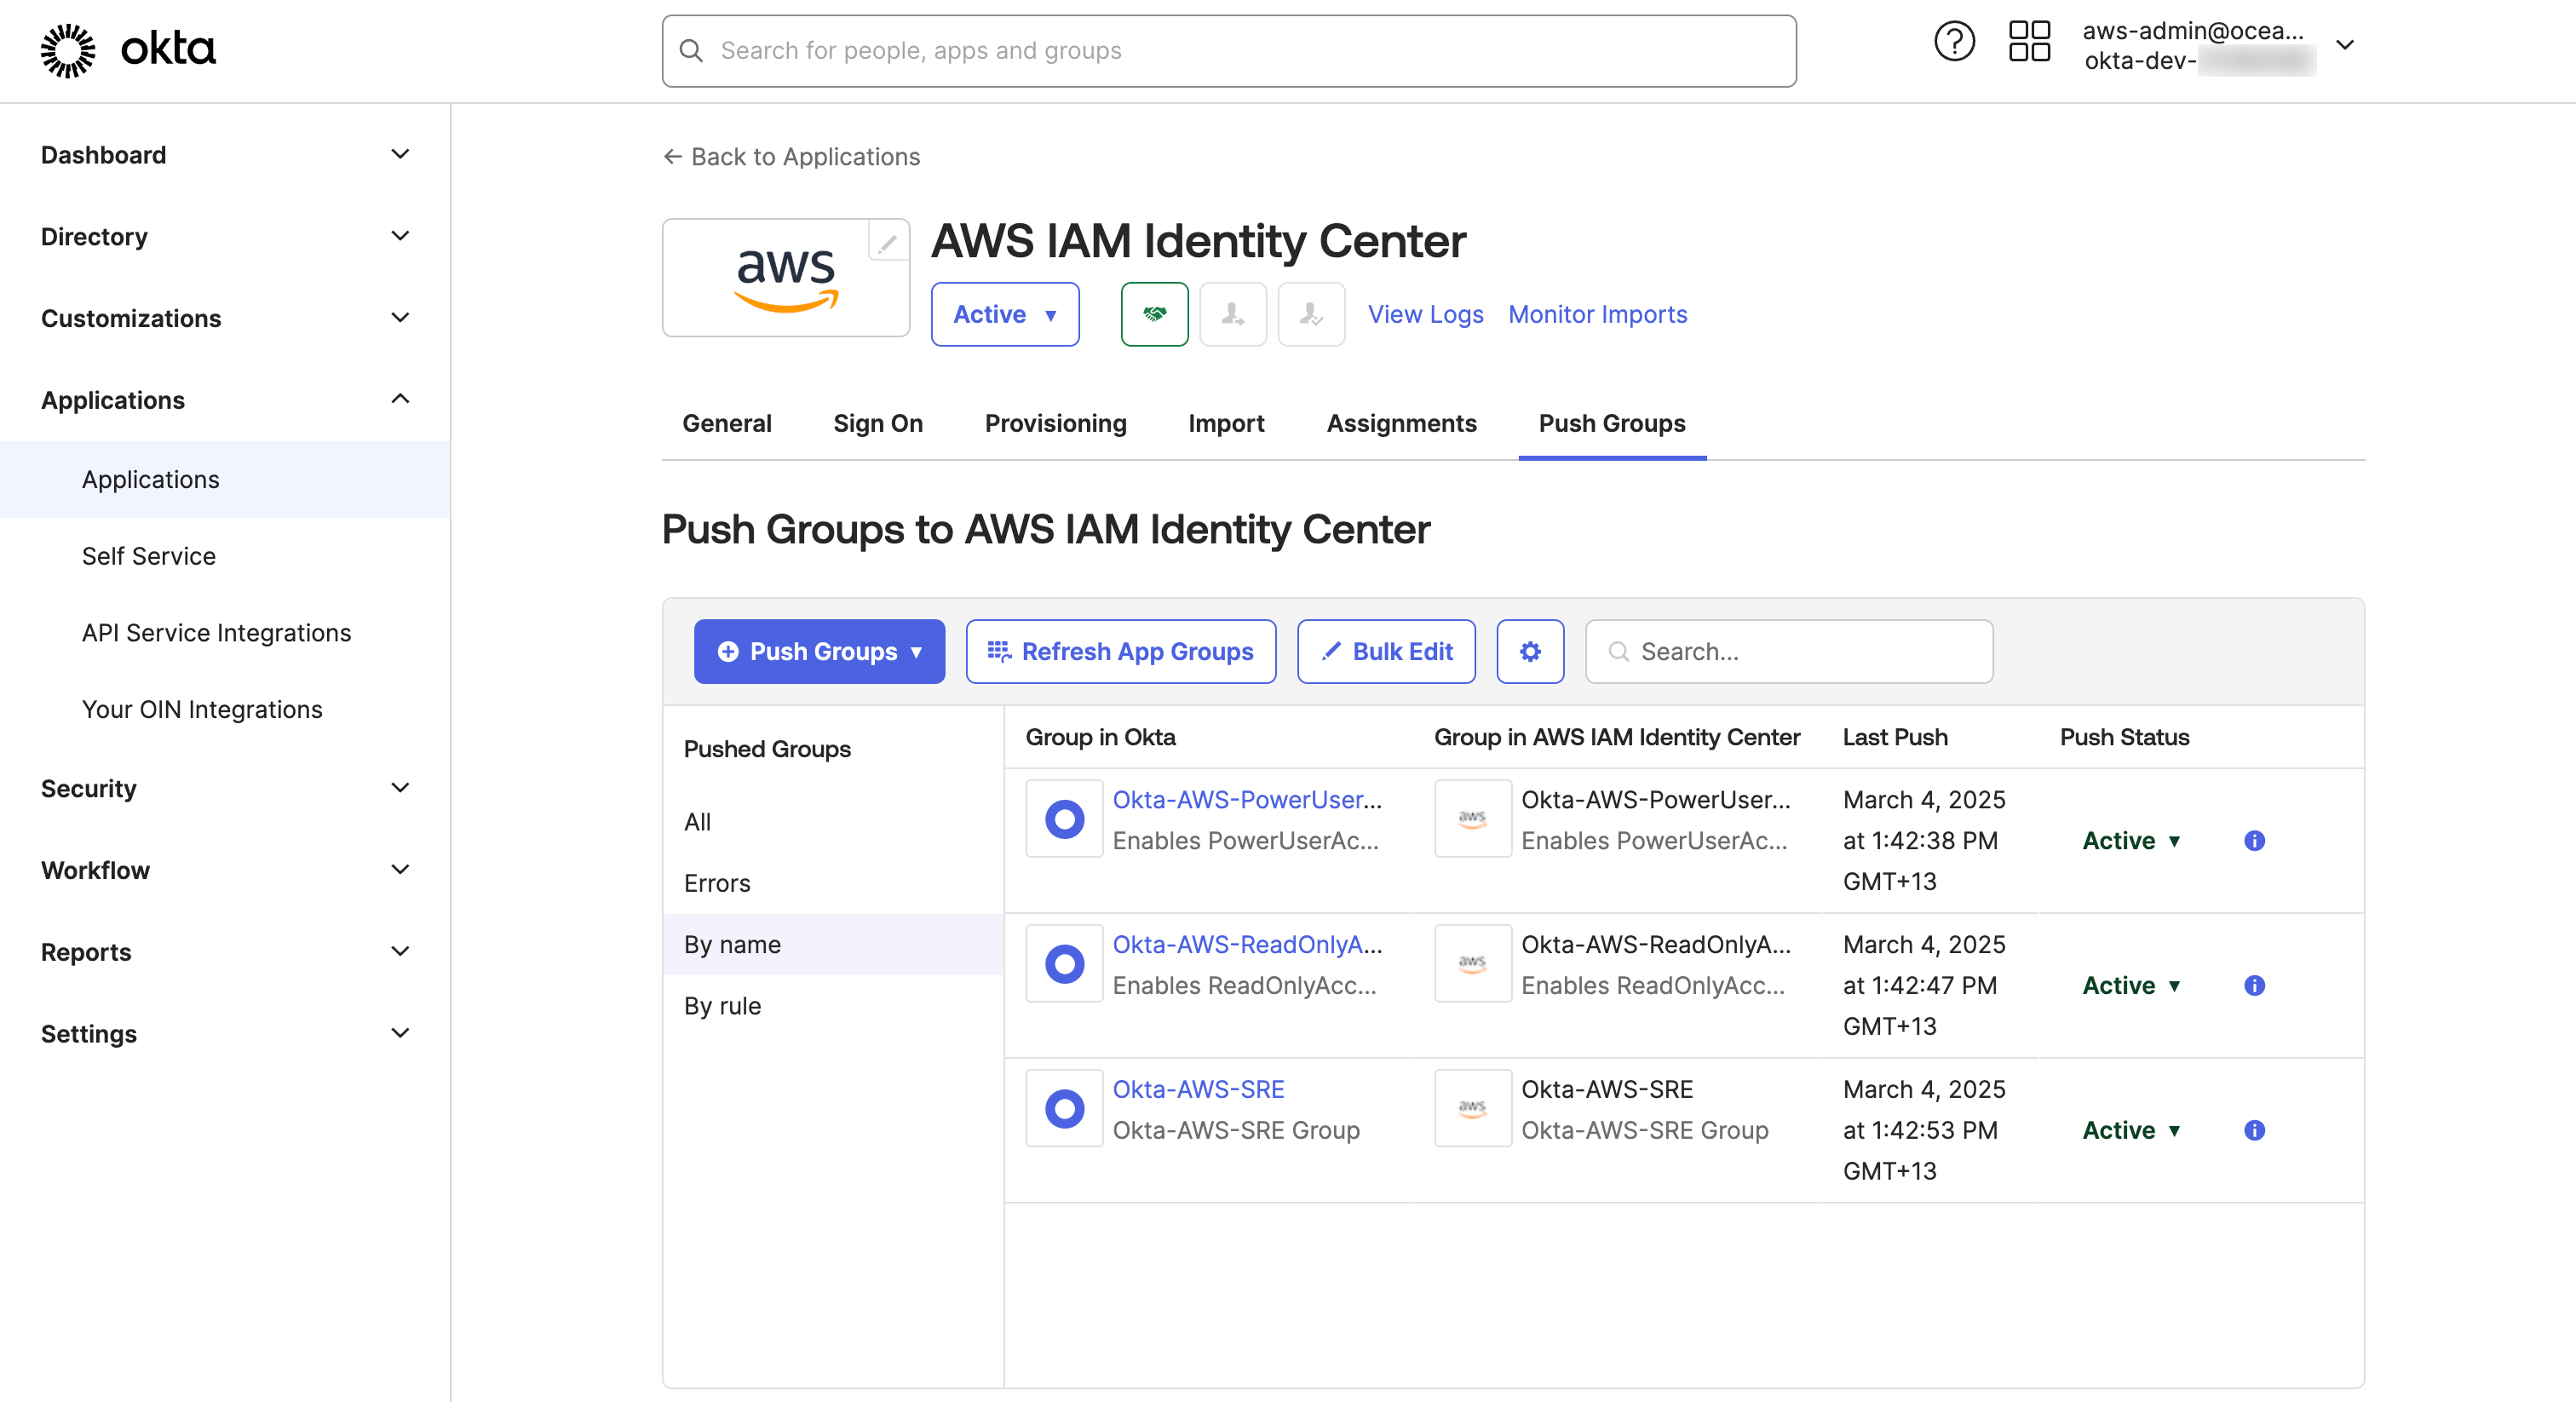
Let's validate the new
Okta-AWS-PowerUserAccessgroup is now synced into AWS IAM Identity Center
- ⛅️ Navigate to the IAM Identity Center Console
- Select Groups from the left menu
- In the Groups list page, validate that
Okta-AWS-PowerUserAccessgroups exists with Created by value asSCIMin IAM Identity Center Group list page.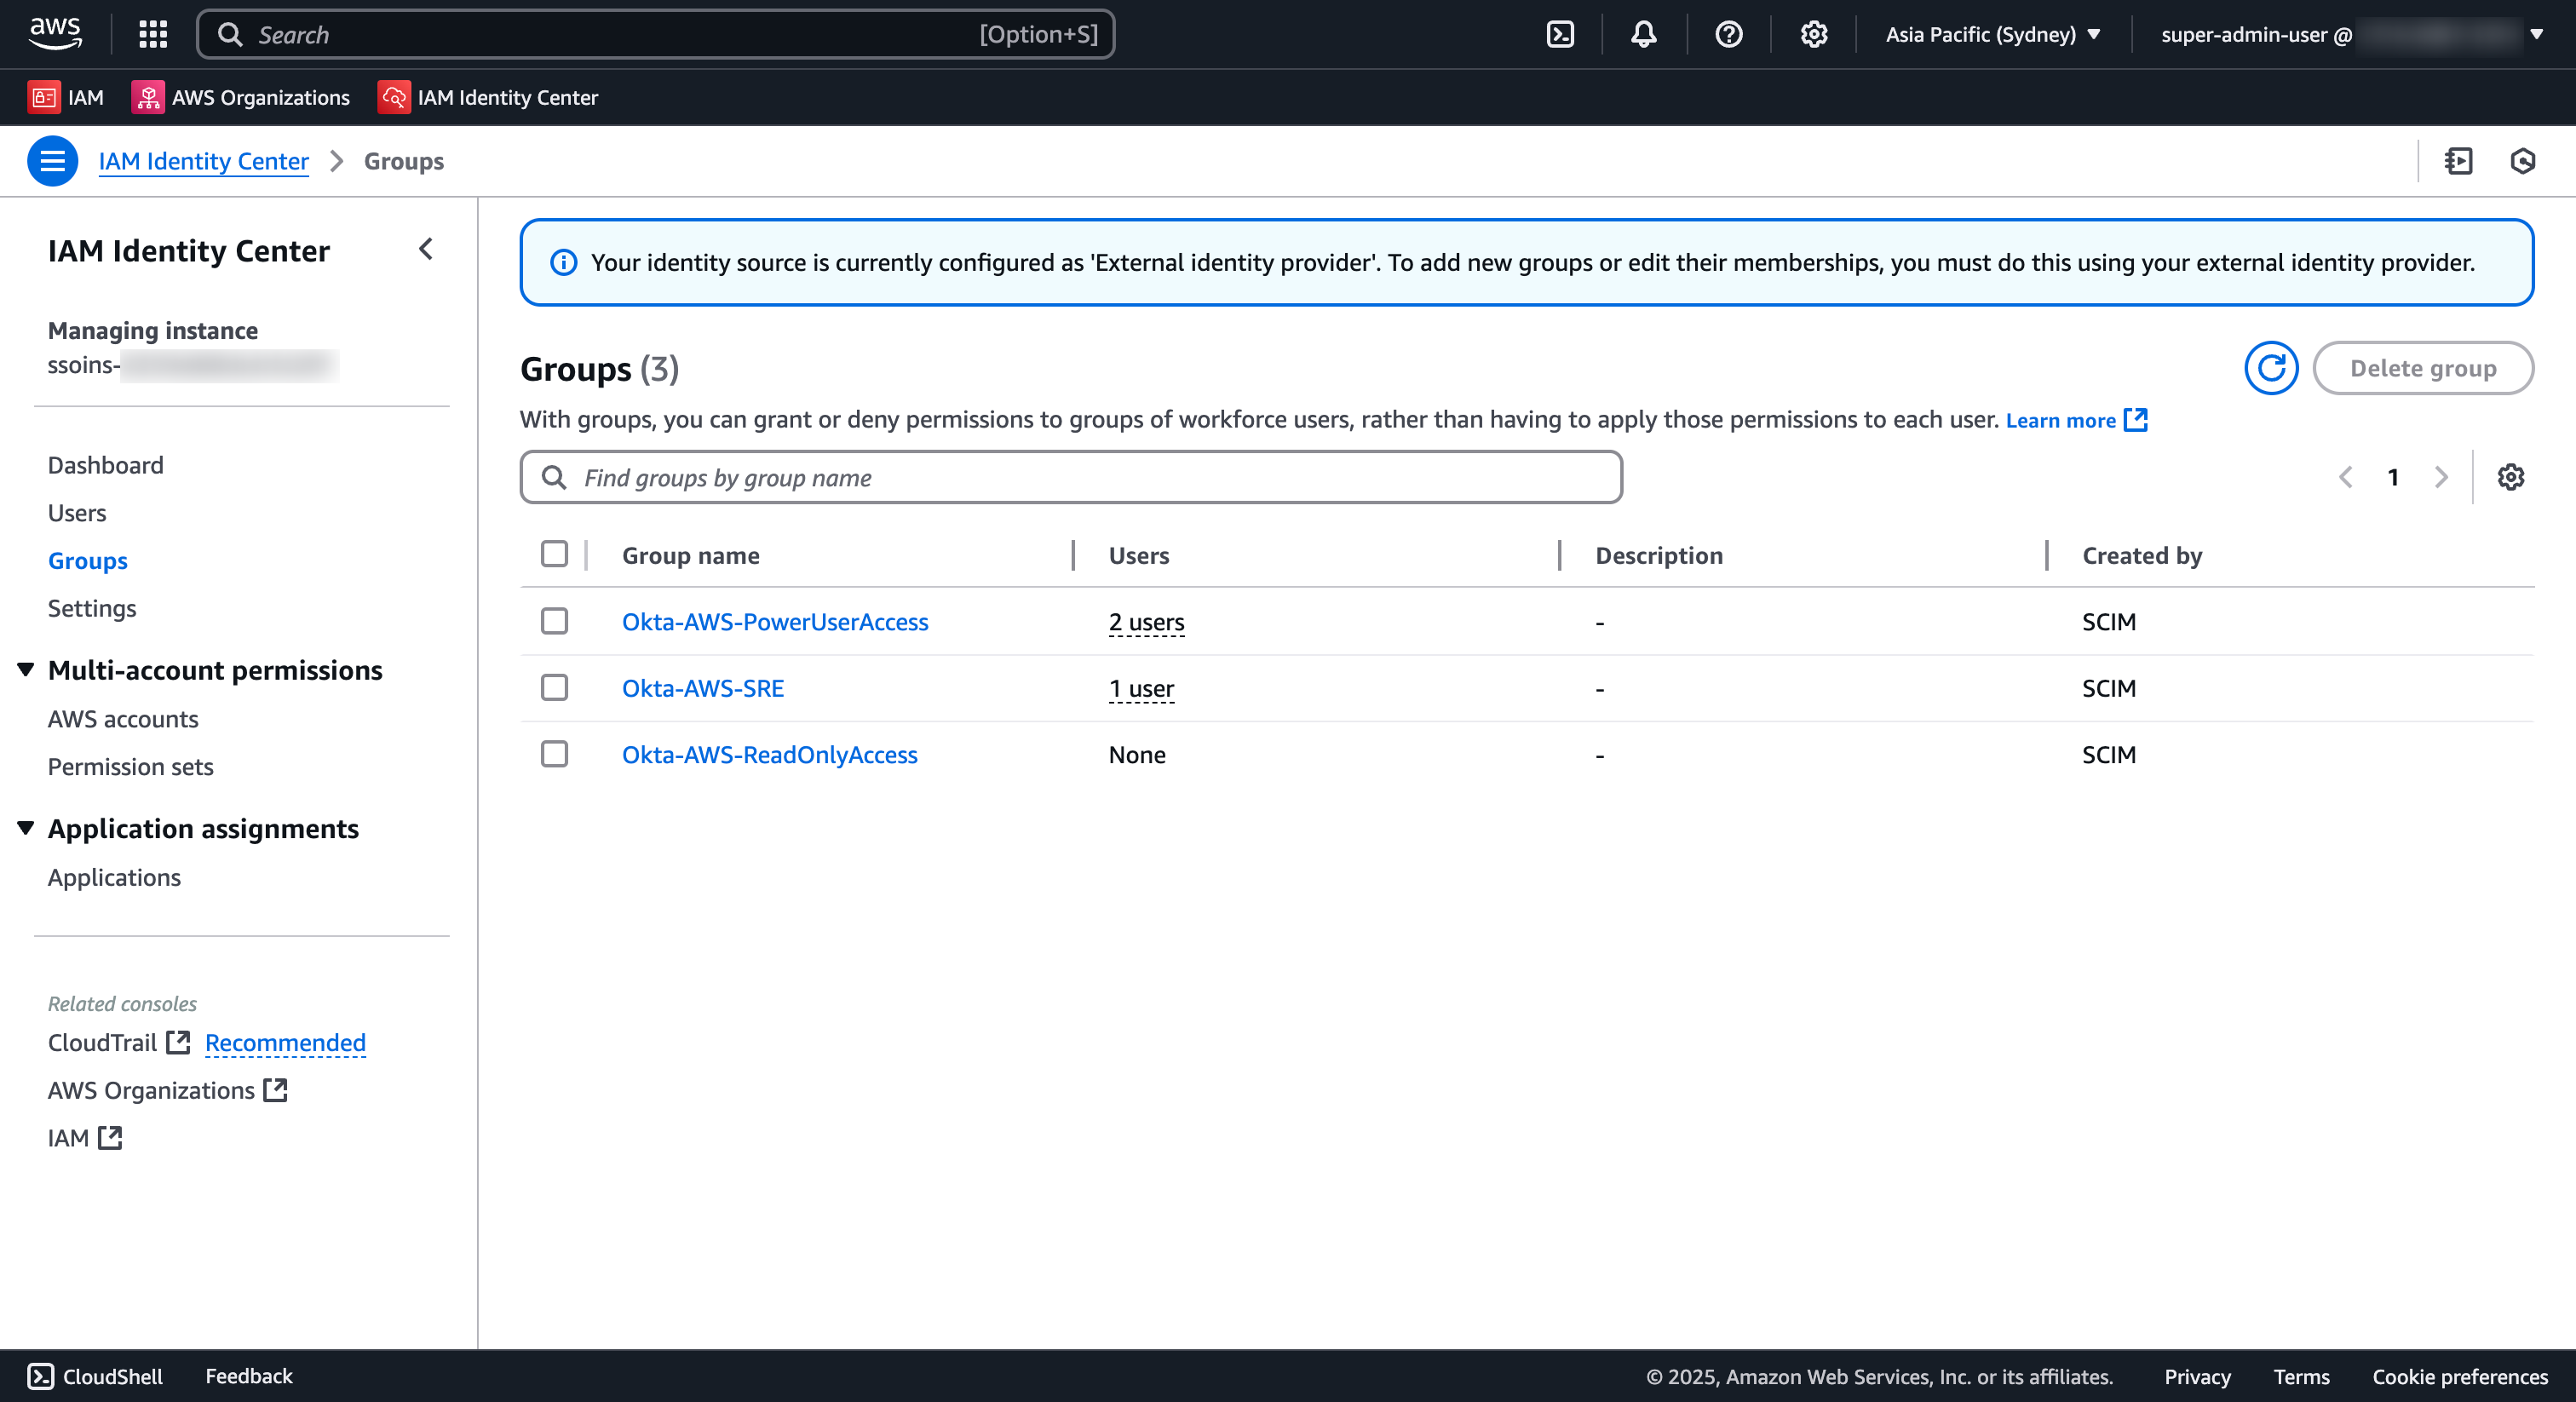
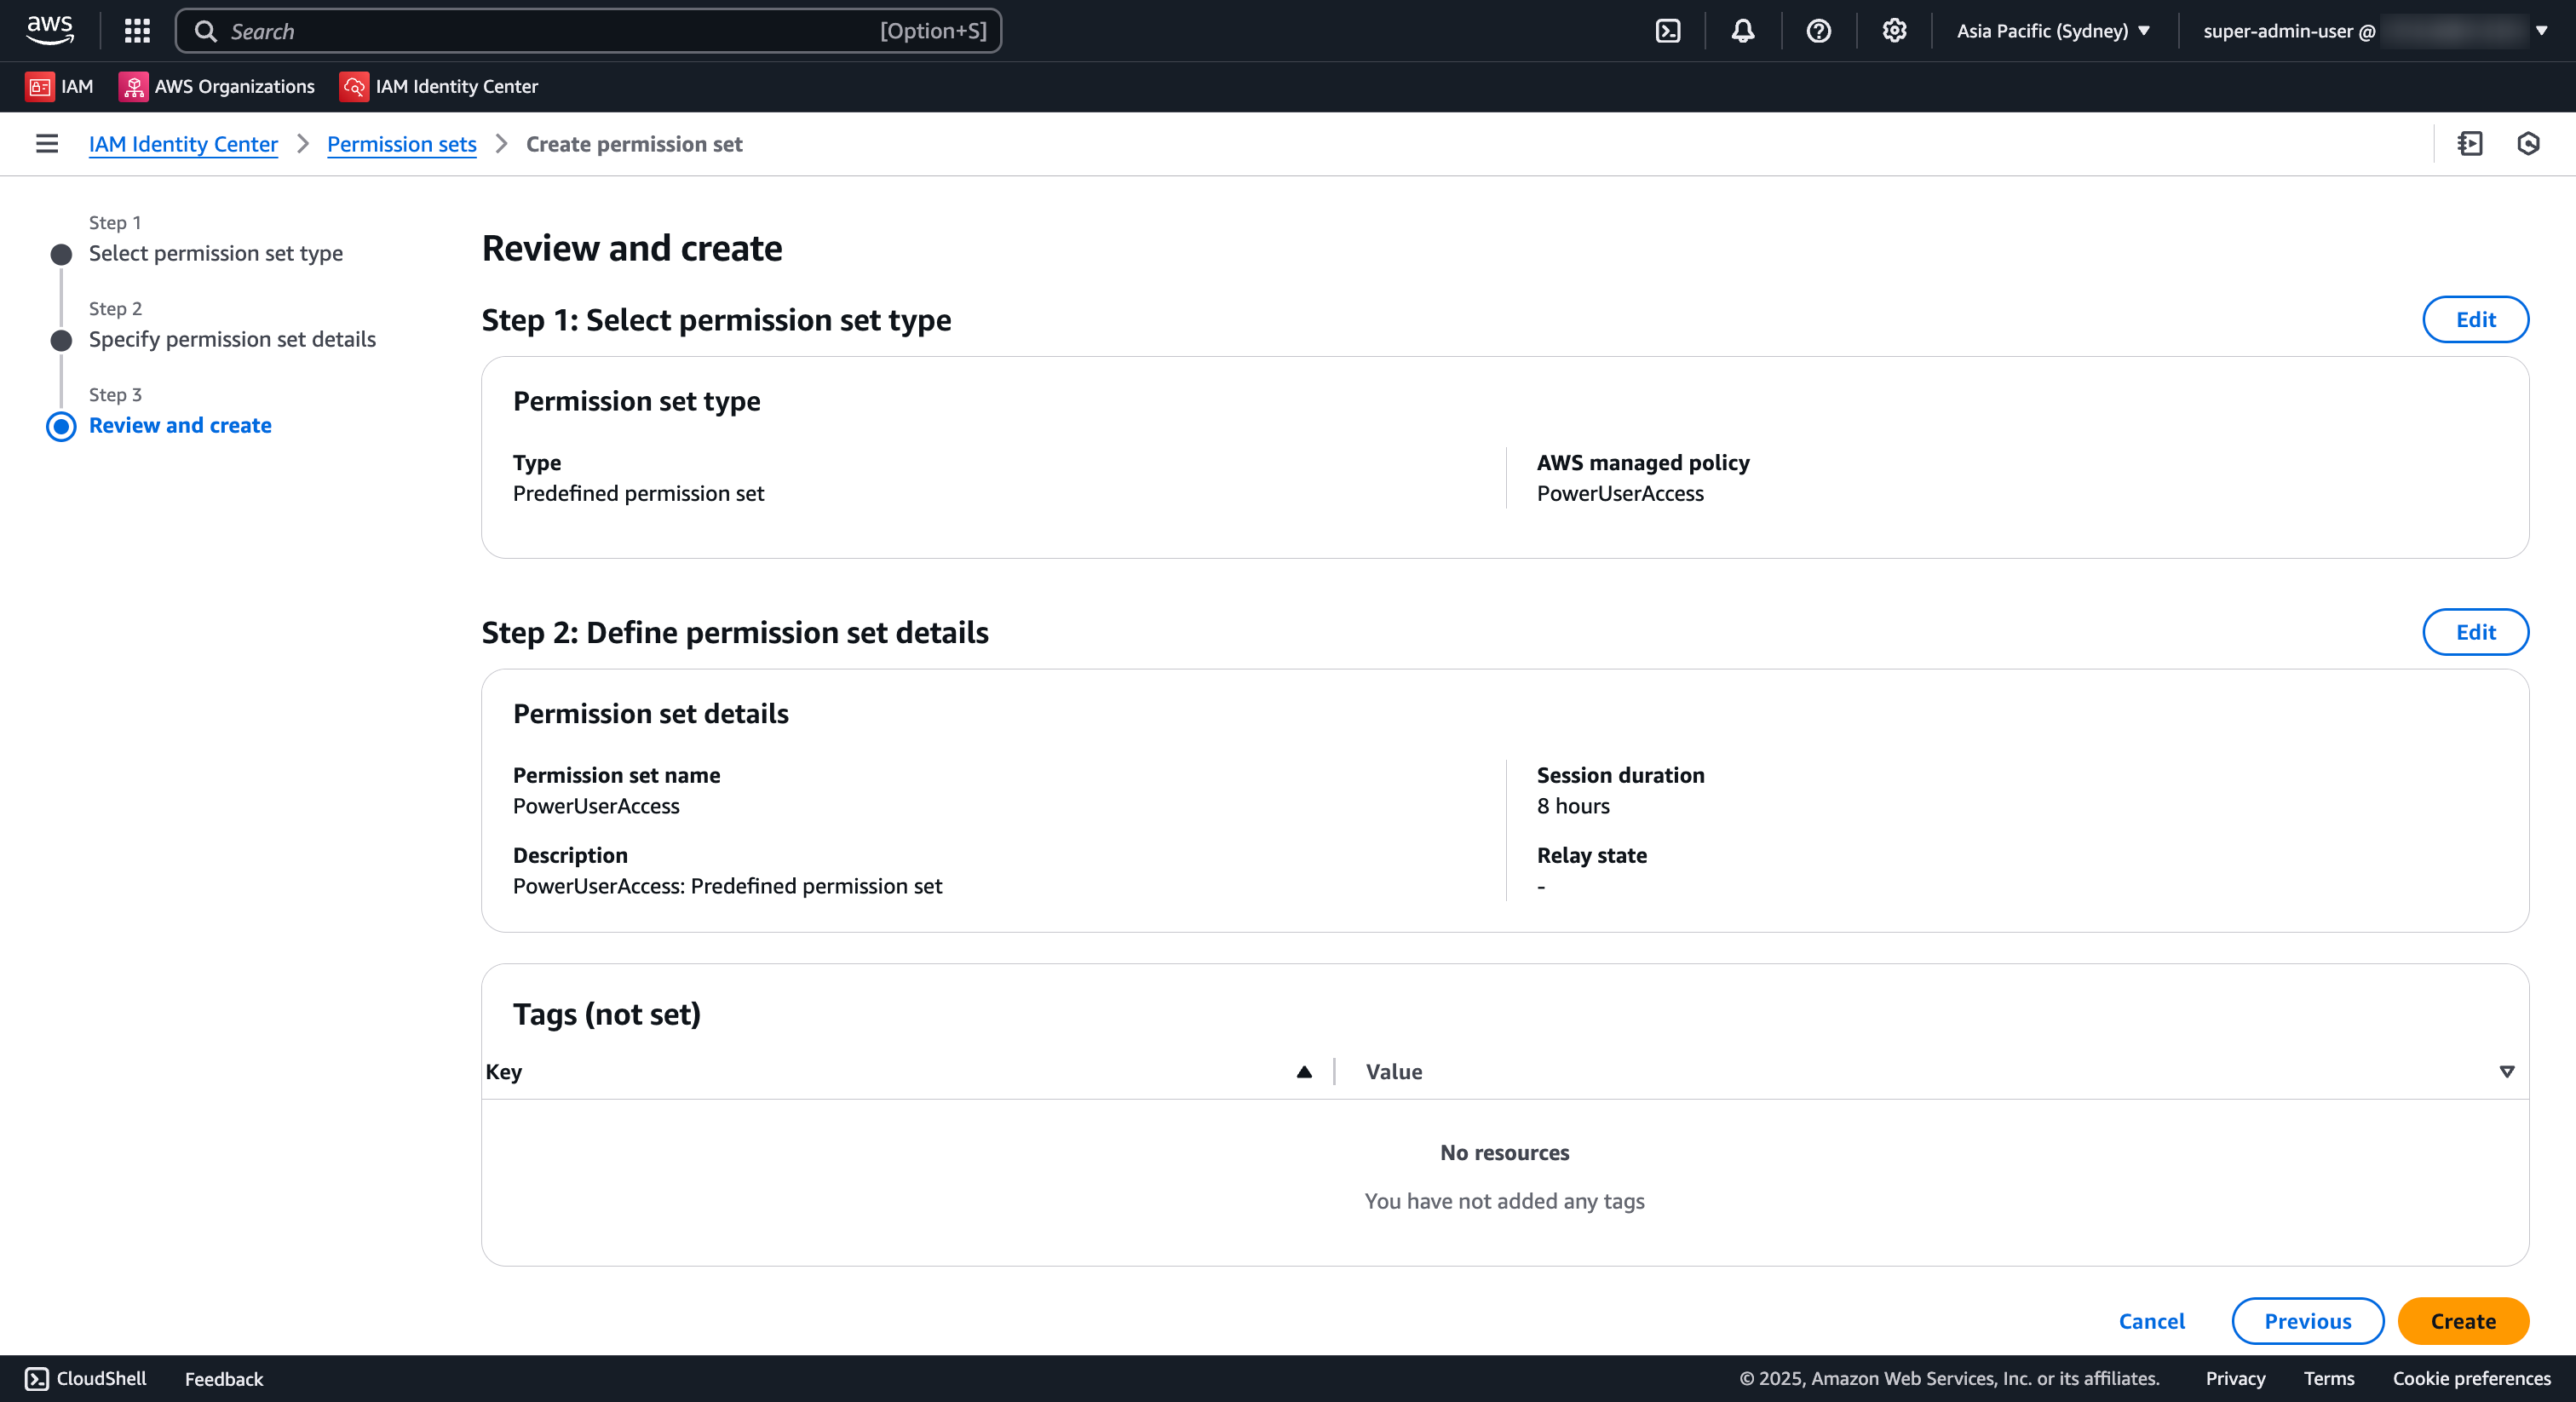
Create Permission Set with PowerUser permission
- Navigate to the IAM Identity Center Console
- Select Permission sets from the left menu
- Click Create permission set
- In the Select permission set type
- Choose
Predefined permission set - For Policy for predefined permission set, Choose
PowerUserAccess - Click Next
- In the Specify permission set details page
- Provide
PowerUserAccessas the Permission set name - Leave rest of the settings as default
- Click Next
- In the Review and create page:
- Review the configuration
- Click Create to create the permission set
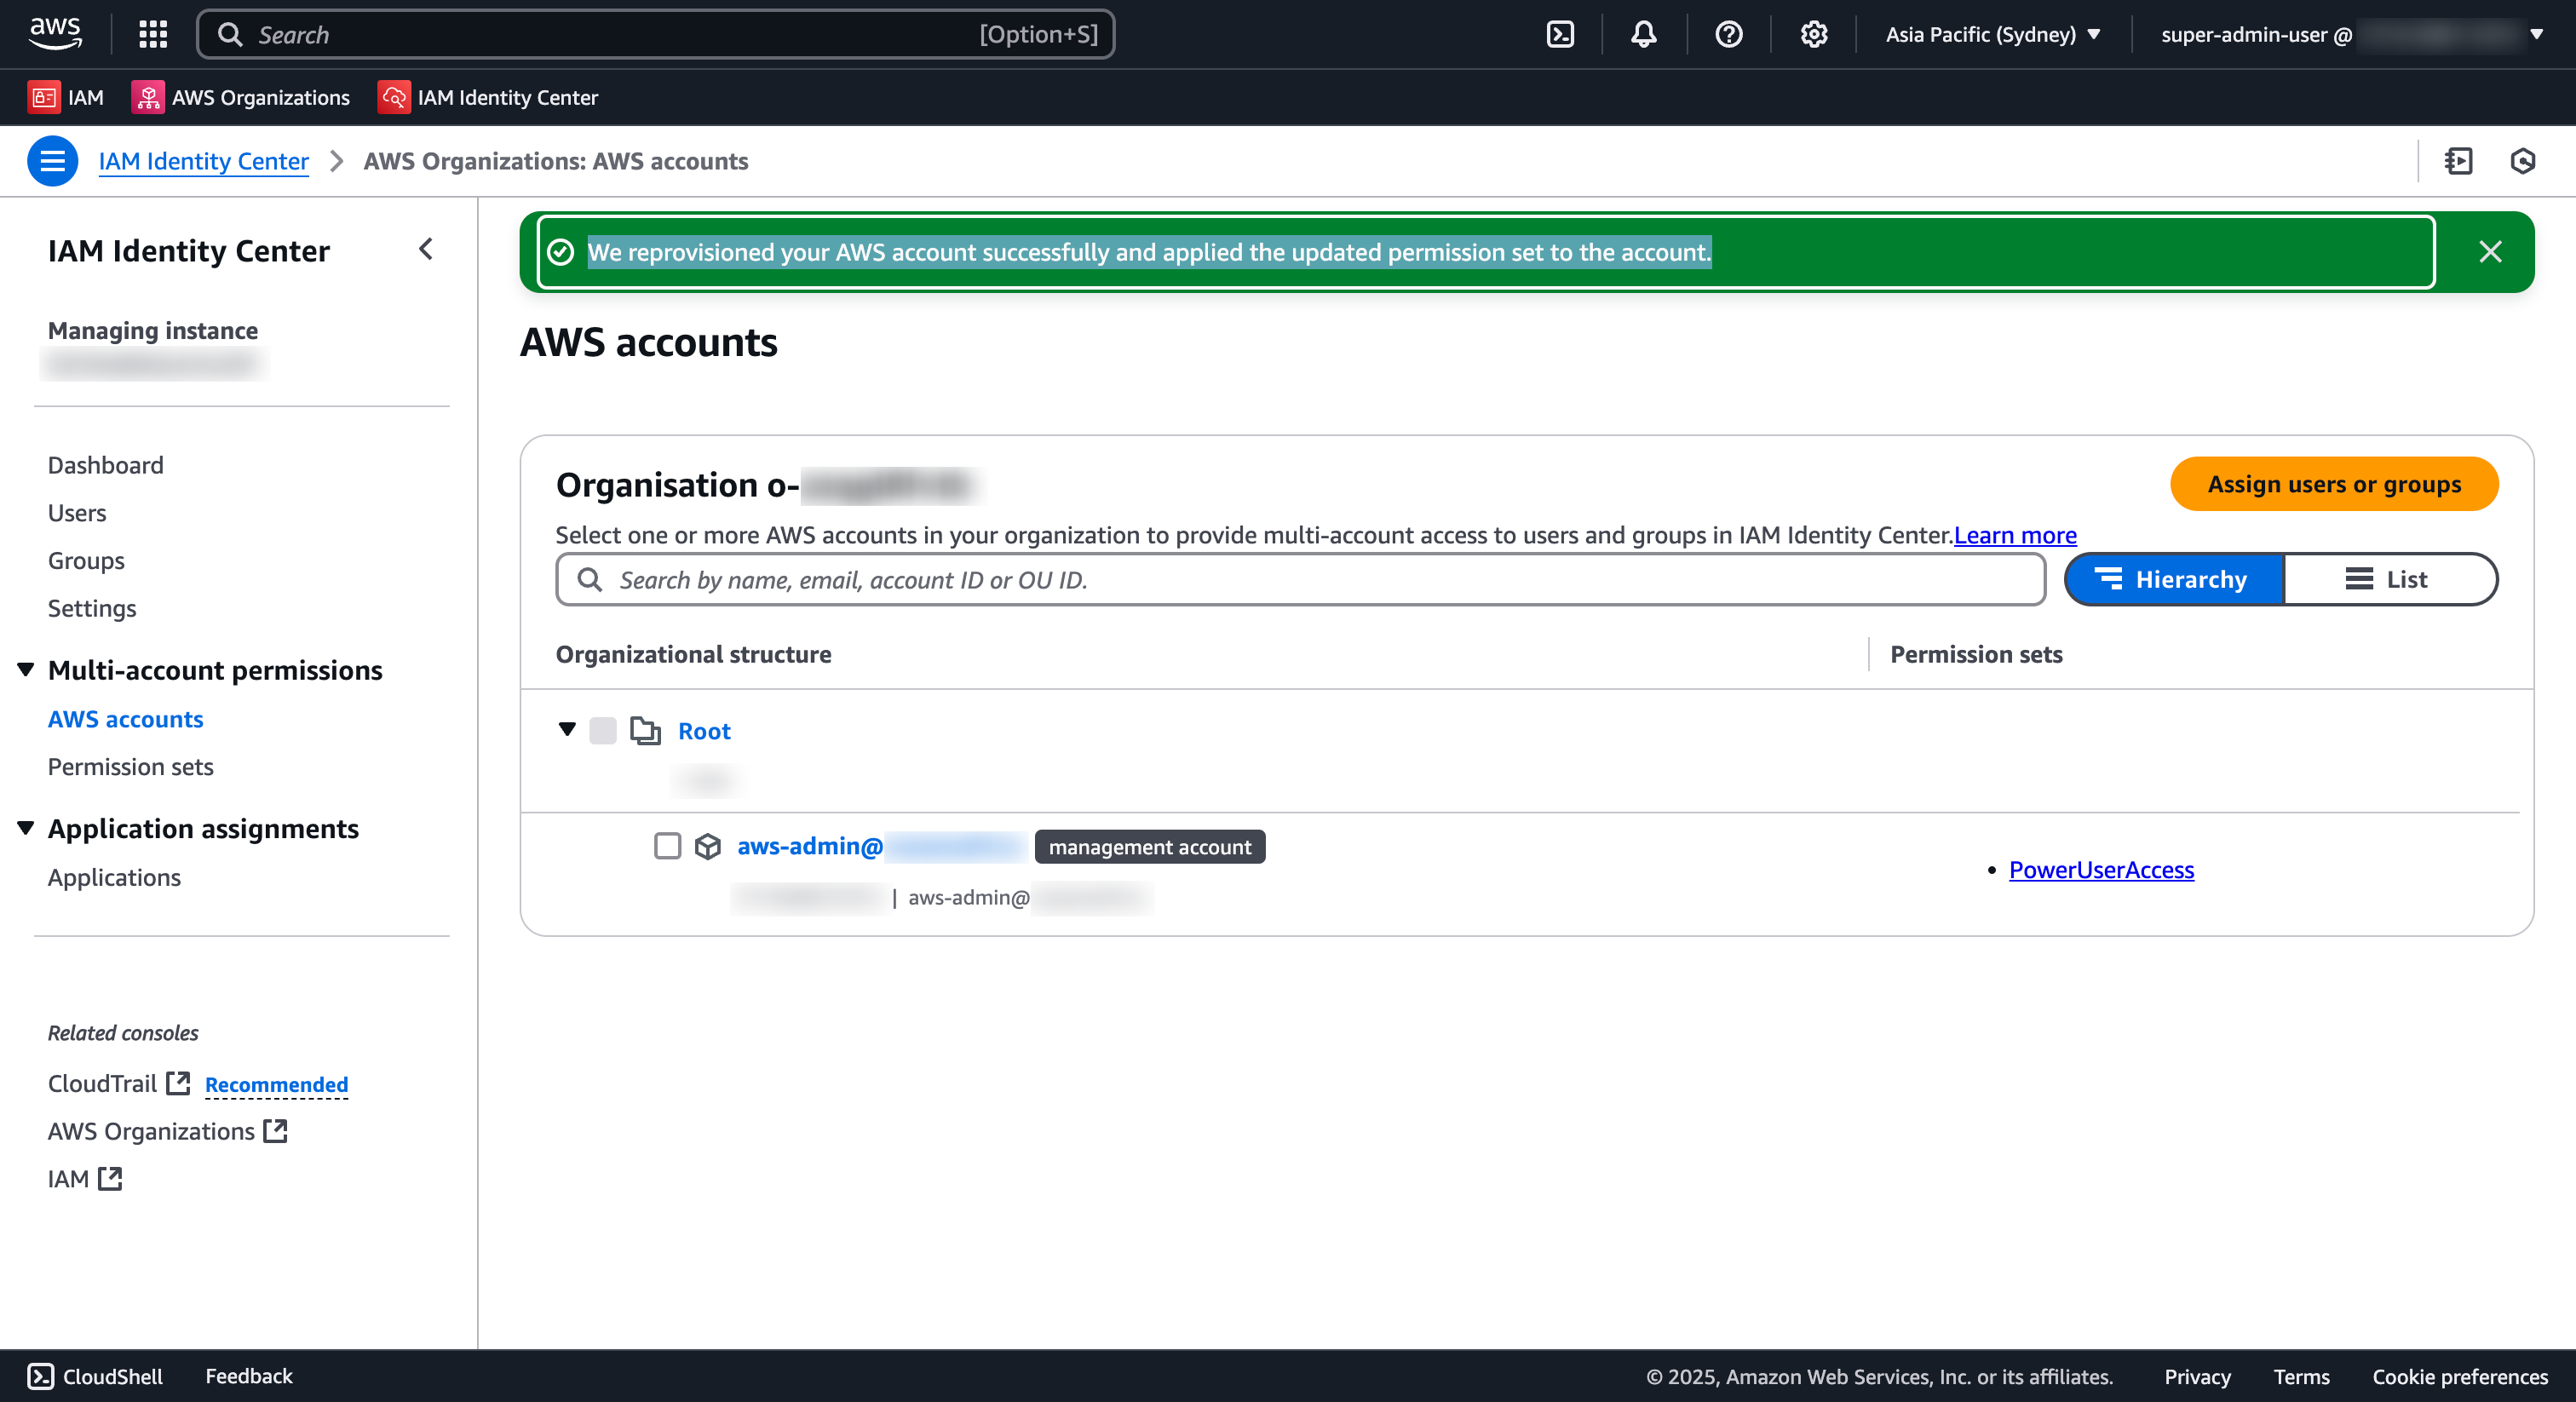
Assign Permission Set to AWS Account
- Navigate to the IAM Identity Center Console, choose AWS accounts
- Choose an AWS account where you want to user to have access.
- Click Assign users or groups.
- In the Assign users and Group to AccountName page:
- Choose the
Okta-AWS-PowerUserAccessgroup - Click Next
- In Select permission sets page,
- Under Permission sets, select
PowerUserAccess - Click Next
- In Review and submit page:
- Review the information
- Click Submit
IAM Identity Center will now associate the User group with the Permission set and assign it to the select AWS Account(s). You should see a page with green banner like below.
9. 🛡️⛅️ Test Access
Now that we have everything configured, we can test the access to AWS with the proper permissions. You can start the test and login from Okta (IDP-initiated) or AWS
- Navigate to the IAM Identity Center Console
- Select Settings from the left menu
- Open the AWS access portal URL in a new browser, the URL should be of the format
https://d-xxxxxxxxxx.awsapps.com/start - This should navigate you to the Okta login page IAM Identity Center Portal page
- Once you provide the user credentials, on successful login , you should be navigated to the SSO portal page IAM Identity Center Portal page
- Navigate to the Management Console using the the
PowerUserAccessrole
⛅️ Cleanup Identity Center resources
- Navigate to the IAM Identity Center Console
- Choose the AWS Region you intend to configure the rule:
ap-southeast-2
- Select
Settingsfrom the left menu
- In the Setting page , choose
Managementtab - Click on the
Deletebutton under theDelete IAM Identity Center instanceconfiguration Settings management tab - Type the ^^instance id^^ in the text box and click on the Confirm button in Dialog window Confirm delete settings
Microsoft 365 (formerly known as Office 365) can be used as an identity provider for AWS (Amazon Web Services) through a feature called AWS Single Sign-On (AWS SSO).
AWS SSO allows organizations to centralize identity management and provide users with seamless access to AWS resources using their existing Microsoft 365 credentials.
Setup Microsoft 365
-
Under https://aad.portal.azure.com/#allservices/category/All go to Enterprise Applications --img src="-assets-refarch-screen-shot-2023-01-13-at-8.33.13-am.png" />
-
Click New Application
-
Choose the right application, for SSO it’s AWS IAM Identity Center (successor to AWS Single Sign-On) --img src="-assets-refarch-screen-shot-2023-01-13-at-8.36.16-am.png" />
-
Click Create, default options are fine
-
On the Left Panel Click Single sign-on, then download the XML File by Pressing the Button on step 5 Set up AWS IAM Identity Center (successor to AWS Single Sign-On) --img src="-assets-refarch-screen-shot-2023-01-13-at-8.41.28-am.png" /> The Metadata file downloaded will need to be given to the 1xOps team, as it is used in AWS for setting up SSO.
-
Similarly, in Jumpstarts the DevOps Accelerator Team will give you an XML file from AWS SSO that contains metadata. Upload this by clicking the Upload metadata file button. --img src="-assets-refarch-screen-shot-2023-01-13-at-8.47.03-am.png" />
-
SAVE
Automatic Provisioning
-
DevOps Accelerator team will provide a URL and secret via 1Password
-
Go to Your App for Single Sign On, on the left Panel go to Provisioning
-
Set the mode to Automatic and Paste the Values provided into the Admin Credentials Section --img src="-assets-refarch-screen-shot-2023-01-13-at-8.53.55-am.png" />
For non-explicitly supported Identity Providers, such as GSuite, set up the app integration with a custom external identity provider. The steps may be different for each IdP, but the goal is ultimately the same.
GSuite does not automatically sync both Users and Groups with AWS Identity Center without additional configuration! If using GSuite as an IdP, considering deploying the ssosync tool.
Please see our aws-ssosync component for details!
-
Open the Identity account in the AWS Console
-
On the Dashboard page of the IAM Identity Center console, select Choose your identity source
-
In the Settings, choose the Identity source tab, select the Actions dropdown in the top right, and then select Change identity source
-
By default, IAM Identity Center uses its own directory as the IdP. To use another IdP, you have to switch to an external identity provider. Select External identity provider from the available identity sources
-
Configure the custom SAML application with the Service provider metadata generated from your IdP. Follow the next steps from your IdP, and then complete this AWS configuration afterwards
-
Open your chosen IdP
-
Create a new SSO application
-
Download the new app's IdP metadata and use this to complete step 5 above
-
Fill in the Service provider details using the data from IAM Identity Center, and then choose Continue. The mapping for the data is as follows:
For ACS URL, enter the IAM Identity Center Assertion Consumer Service (ACS) URL.
For Entity ID, enter the IAM Identity Center issuer URL.
Leave the Start URL field empty.
For Name ID format, select EMAIL. -
If required for the IdP, enable the application for all users
-
Finally, define specific Groups to match the given Group names by the aws-sso component (
stacks/catalog/aws-sso.yaml). In the default catalog, we define four Groups:DevOps,Developers,BillingAdmin, andEveryone
If set up properly, Users and Groups added to your IdP will automatically populate and update in AWS.
Additional IdP specific setup reference can be found here:
JumpCloud is a cloud-based directory service that provides secure, frictionless access to AWS resources. It can be used as an identity provider for AWS (Amazon Web Services) through a feature called AWS Single Sign-On (AWS SSO).
Follow the JumpCloud official documentation for setting up JumpCloud with AWS IAM Identity Center:
Integrate with AWS IAM Identity Center
The official AWS documentation for setting up JumpCloud with AWS IAM Identity Center is not accurate. Instead, please refer to the JumpCloud official documentation
- Identify: NIST Cyber Security Framework (CSF) Functions
- Directive: Cloud Adoption Framework (CAF) Components